

Playlist Settings
This section appears in the Master Audio game object. The Playlist Settings section allows you to create Playlists and Playlist Controllers. You need both of these to play music.
- Playlist: A Playlist is simply a group of songs. The "songs" can be just components (or "stems") of a song as well - like "Battle Drums" - if you want to use layered music.
- Playlist Controller: A Playlist Controller is like a Jukebox that plays songs in a Playlist. To be able to hear a Playlist, it must be hosted by a Playlist Controller. The Controller has features like shuffle, Auto Advance and crossfading. It can only host one Playlist at a time. Most people need only one Playlist Controller, but you can have as many Playlist Controllers as you have pieces of layered music you want to play together. So if you had tracks for drums, keyboards, and guitar that when played together make a song, you could use 3 Playlist Controllers to combine them, while putting each track in a separate Playlist.
There are 5 main sections to Playlist Settings, listed below. Click on the links below to read more about each.
- Top Section (for Spatial Blend)
- Playlist Controller Setup
- Playlist Setup
- Playlist Song Controls
- Jukeboxes
Top Section
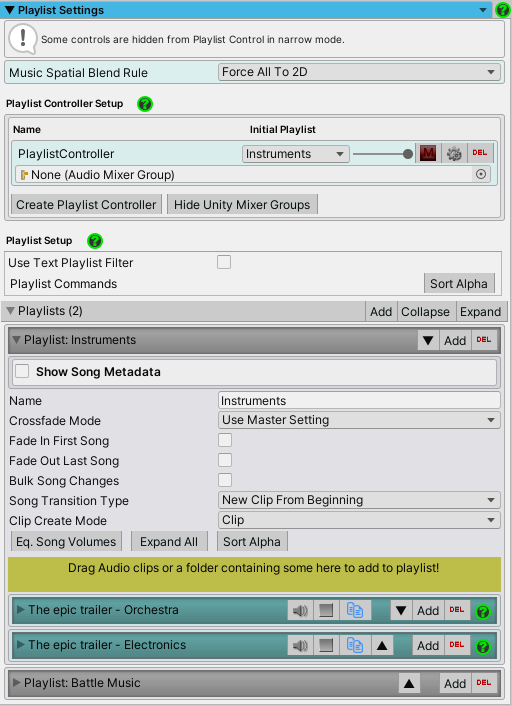
Music Spatial Blend Rule: Since Unity 5, Audio Clips no longer have a setting to tell Unity they are meant to be 2D or 3D sounds. A similar setting for that is on each Audio Source instead, called Spatial Blend. Master Audio handles this for you with Spatial Blend Rule controls. If you wish to globally set all music to 2D, 3D or Custom (value between 0 and 1 where 0 is 2D and 1 is 3D), pick one of the first 3 options. Option 3 will allow you to pick the Spatial Blend (0-1). The last option will instead allow you to set a similar control on each Playlist Controller's settings (click the gear for that Playlist Controller on the Playlist Controller Setup section to find it). Choices for Music Spatial Blend Rule are:
- Force All To 2D: All Audio Sources in all Playlist Controllers will be fully 2D (Spatial Blend: 0).
- Force All To 3D: (The default) All Audio Sources in all Playlist Controllers will be fully 3D (Spatial Blend: 1).
-
Force All To Custom: All Audio Sources in all Playlist Controllers will be set with the value you provide in the field that appears next called Music Spatial Blend.
- Music Spatial Blend: Only appears when using Force All To Custom and will be used to set all Audio Sources in all Playlist Controllers with the value you provide here.
- Allow Different Per Controller: Audio Sources in each Playlist Controllers will be set according to what is set in the Playlist Controllers's Spatial Blend Rule.
Playlist Controller Setup
This section lists your Playlist Controllers and lets you create more of them as well as make certain changes to them. You can have a Playlist Controller do fades, mutes, and a lot more from the Event Sounds script with no coding!
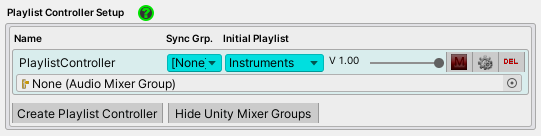
The image above was taken in Normal mode (not Narrow - change in Advanced Settings) and shows a single Playlist Controller. The following fields are displayed for each Playlist Controller:
- Playlist Controller name: If you need to change this, edit the game object's name in the Hierarchy. by default they are all called "PlaylistController". Each Playlist Controller in a single Scene must have a unique name.
- Sync Group: Off by default (labeled [None]). It's optional and is a number 1-4. If you assign a number, then whenever a new song is played, its time (position in song) will be set to the time of the song playing in the first matching Playlist Controller (with the same Sync Group and a clip playing). This will also help align layered Resource File clips more precisely. This setting is only used with Playlists that have a Song Transition Type of "Synchronize Clips".
- Initial Playlist: Here you select a Playlist to start with. If "Start Playlist on Awake" is checked on the Playlist Controller game object, the music will start playing a song from the Playlist when the Scene starts.
- Playlist Volume (slider): Think of this as the volume of the Playlist Controller itself. This is a way to balance volumes between multiple Playlist Controllers' Playlists.
- Mute button ("M"): This will mute all music from this Playlist Controller.
- Settings (gear icon): Takes you to the Playlist Controller game object in the Hierarchy, so you can tweak additional settings.
- Delete button: Deletes the Playlist Controller from the Scene.
- Unity Mixer Group: Each Playlist Controller will have an Audio Mixer Group field under it. You may assign each Playlist Controller to a corresponding Mixer Group so you can take advantage of Unity 5 Mixer features. This will route all Audio Sources on the Playlist Controller to the Unity Mixer Group. If you have layered music with more than one Playlist Controller, you may wish to create additional Mixer Groups for each Controller.
Under the Playlist Controller Setup section are a few buttons:
- Create Playlist Controller: Clicking this will create a Playlist Controller.
- Hide / Show Unity Mixer Groups: This can hide the Unity Mixer Groups after you've set them up so they don't take up room on the screen.
Playlist Setup
This is the section where you will create and configure your "static" Playlists. You can also create "dynamic" Playlists from the Dynamic Sound Group Creator prefab.
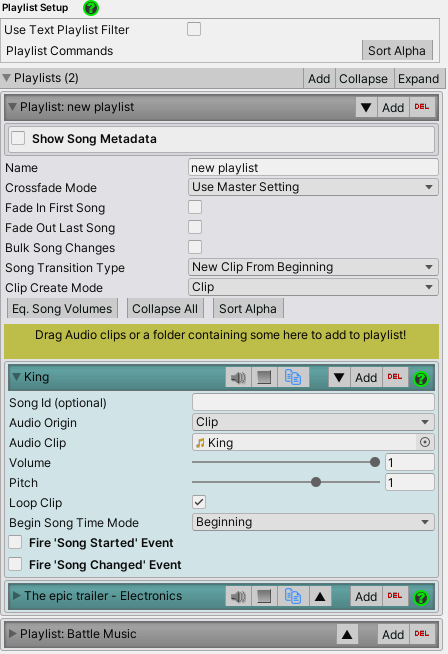
The image above shows 1 Playlist with 2 songs, and another Playlist collapsed. There are several buttons at the top.
- Use Text Playlist Filter: Check this box to enter a partial Playlist name. Anything not matching below will be filtered out.
- Sort Alpha: This will sort the Playlists alphabetically.
- Add: This will create a new Playlist.
- Collapse: This will collapse all the Playlists so you can see them all at once.
- Expand: This will expand all the Playlists.
Each Playlist has the following settings:
- Add / Delete / Shift Up / Shift Down buttons: Add a new Playlist / Delete the Playlist / Shift Up or Down the Playlist (re-order).
-
Show Song Metadata: This is an optional feature. If you turn this on, you can define any number of metadata properties to give you more information about each song in your Playlist. When it is on, each song also has a visible section where you can edit its metadata based on the properties you define here. Since this can take up a good portion of screen real estate, you can hide it by turning this off. Here's how that section looks with an Author property added.
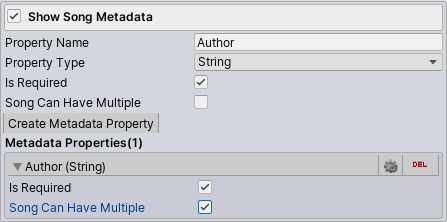
Now let's explain the fields here:
- Property Name: This is what you want to call the property, which is how it will show up under each song for you to fill out.
- Property Type: Choose String, Boolean (true or false), Integer or Float.
- Is Required: If you select this, each song must have this property. We manage this for you. When you create the property, it will be added to each song. If you make an existing property required and it wasn't before, it will be created for any songs that don't have it.
- Song Can Have Multiple: If you select this, each song can have more than 1 of the property. No limit. You will be able to add as many as you like under the song.
- Create Metadata Property: This will create the property and it will show up in the table below.
- Metadata Properties: The table below this heading will display each property you have created. You wil be able to change the name (with the gear icon), delete it and change the checkboxes for it.
Note: You can read the metadata for a song if you subscribe to the SongChanged event of PlaylistController. A MusicSetting object containing everything about the song is passed to the SongChanged event handler. - Playlist name: This is used if you want to play a specific Playlist by name. Name it something meaningful to yourself.
-
Crossfade Mode: This dropdown by default it uses the Master Setting (Master Crossfade Time) in the Master Audio game object. You can also choose Override and specify this Playlist's crossfade time with the next field.
- Crossfade time (sec): The crossfade time to use when playing this Playlist. Only visible if Override is chosen.
- Fade In First Song: Check this box to fade in the first song (meaning: when you play a song and no song is already playing). For this setting, and the next (Fade Out Last Song), the Crossfade time will be used as the duration.
- Fade Out Last Song: Check this box to fade out the last song (meaning the Playlist Controller does not have Loop Playlists checked and no song will play after this). Note that if you have not enabled Auto Advance, every song is the "last" and will fade out and stop the Playlist playing at the end of the song.
-
Bulk Song Changes: You can expand this section to make bulk changes in any number of selected songs. A real time-saver! The steps are below.
- Check the Bulk Song Changes checkbox here.
-
A checkbox will appear on all song as long as Bulk Song Changes is checked.

- Check all the songs you want to make bulk changes to. It's good to click the Collapse All button so you can see them all on one screen. Also use the Check All or Uncheck All buttons in this section if you like.
- Make a change to any field in one of the checked songs, and all checked songs will change to the same value. Audio Origin and Audio Clip do not bulk edit because that's not deemed useful.
- Don't forget to uncheck the Bulk Song Changes checkbox when you're done doing bulk changes.
-
Song Transition Type: This has several choices:
- New Clip From Beginning: Default setting - this will play each song from the beginning, unless you have specified a different time to start at under the "Begin Song Time Mode" settings below.
- New Clip From Last Known Position: This will let each song always resume from the last position it was at before crossfading to another song. If there is no previous play of the song, it will start from the beginning. Note that this only works for songs within the same Playlist - last known positions for each song will be lost when you change to a different Playlist. Usually it's advantageous to put all songs into a single Playlist anyway.
- Synchronize Clips: With this setting, playing the next or random song will start the new clip at the same position (time) the previous clip was at. Very cool for crossfading between alternate version of the same track. Also see the Sync Group field in Playlist Controller for keeping multiple tracks of music aligned to the same time!
Note: If you use Synchronize Clips and your crossfade is not zero, Auto Advance is disabled in any Playlist Controller using this Playlist and all clips in the Playlist will loop. This is to prevent a lot of weird and unavoidable bugs in this mode having. - Clip Create Mode: Same as Variation Create Mode on Sound Groups. This controls whether you're creating Resource file clips or Audio Clip clips when you drag in clips to the yellow drag area.
-
A few buttons for the Playlist:
- Eq. Song Volumes (Equalize): Clicking this button will mathematically even the volume of all songs in a Playlist based on their average volume. It will move the volume sliders of the songs to do this. No alteration of the sound clips is done. Note that compressed and streaming songs cannot be scanned, so they will be skipped.
- Collapse All: This will collapse all the songs in the Playlist.
- Sort Alpha: This will sort the songs in the Playlist alphabetically. Note that Song Id (Alias) - if not blank - will be used for sorting instead of the default-populated song name. This also allows you to use the same clip with different aliases for different settings (pitch, volume, etc) without having to create copies of the file.
- Yellow Drag Area: Drag audio files into this area to add song(s) to the Playlist under it. You can click the lock icon at the very top right of the Inspector to enable selection of multiple clips from Project View without losing focus on the Inspector so you can drag in several at once.
Playlist Song Controls
You can add any number of songs. The songs in the Playlist will play from top to bottom if you have not enabled Shuffle Mode.
Each song in the Playlist has the following controls:
-
Title bar: The following buttons are present on the title bar:
- Collapse / Expand arrow: Collapse or Expand the song's settings.
- Song Name: Shows the Song Id or default-populated song name (from Audio Clip name).
- Preview / Stop: Preview or stop previewing a song.
- Clone: Make another copy of this song and place it just below this song.
- Shift Up / Down: Shift the song up or down in the Playlist sequentially.
- Add / Delete: Add a blank song or delete the song.
-
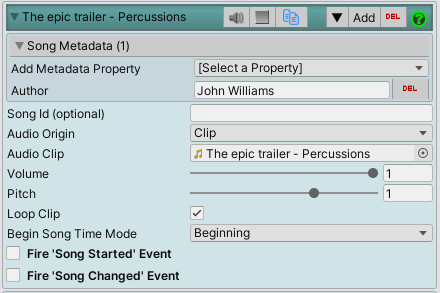
Song Metadata: This section shows up only if you have "Show Song Metadata" checked in the Playlist top section. The fields are the following:
- Add Metadata Property: This will allow you to add properties that either Allow Multiple Per Song or aren't required and you don't have yet for this song.
- Property Values: All the song's properties show up below the dropdown and here you can specify values for each property.
- Song Id: (Optional field) Whenever a song is requested to play by name, the Song Id's will be searched before clip names. This allows you to play songs in different Playlists by a common alias like "Intro", "Battle Music" etc when you use different music for "audio skins" (enabled by Dynamic Sound Group Creators) or levels. Note that you *will* want to assign an alias to every Addressable song (you'll need to enable the feature on the Welcome Window) if you'll want to play them by name so that you don't have to specify the entire folder path.
- Audio Origin: This lets you choose between the different Audio Origins, which affect memory usage and latency. Read about the options on that page.
-
Begin Song Time Mode: 4 choices.
- Beginning: The default. Song will start at the beginning.
- Specific Time: A "Start Time" field will appear underneath, where you can specify what time the song should start at.
- Random Time: 2 fields (Start Time Min/Max) will appear underneath, so you can specify a range from which a random time will be chosen to start the song at.
- Section: This allows you to play a section of a song. Two fields (Section Start Time / Section End Time) will appear underneath, so you can specify the range of your section. If you loop the song, the section looping will be seamless.
- Start Time (seconds): This specifies what position (time) the song will start playing at. Does not appear with Song Transition Type set to "Synchronize Clips". When using "New Clip From Last Known Position", this setting is only used the first time a song is played - otherwise last position is used.
- Fire "Song Started" Event: This work like the Song Changed Events for the Playlist Controller and allow you to fire a Custom Event per song, when the song starts. Good for "stingers".
- Fire "Song Ended" Event: This work like the Song Ended Events for the Playlist Controller and allow you to fire a Custom Event per song, when the song ends. Good for "stingers".
Jukeboxes
During Play mode, a Jukebox will show up for each Playlist Controller in the Scene showing the active song and other controls. It shows up near the top of the Master Audio game object, so technically it's not in the Playlist Settings section. Since it has to do with Playlists and Playlist Controllers though, it's explained here.
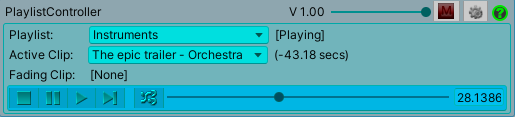
The Jukebox has the following controls:
- Playlist Controller name: The top bar shows the name of the Playlist Controller game object.
- Volume Slider: Same as the Playlist Volume control on the Playlist controller game object.
- Mute button ("M"): Same as the mute button for each Playlist Controller that shows up in the Playlist Settings section.
- Playlist: Shows the current Playlist. You can switch to another Playlist by choosing it from the dropdown. To the right of the dropdown, the Play mode is shown (Playing / Paused / Stopped / Crossfading).
- Active Clip: Shows the current song playing (or paused). If no song is loaded yet, this will be blank. You can switch to another song by choosing it from the dropdown. To the right of the dropdown it shows the time remaining for the song, which does account for pitch, so it means actual real time remaining.
- Fading Clip: Shows the current song fading out. This is only non-blank during a crossfade. To the right of the dropdown it shows the time remaining for the song, which does account for pitch, so it means actual real time remaining.
-
Jukebox Buttons: On the bottom row, left to right.
- Stop: Stops the Playlist.
- Pause: Pause the Active Clip.
- Play: Unpause a paused Active Clip or start the Playlist playing if it's stopped.
- Next Track: Switch to the next song. Works if stopped as well.
- Random Track: Play a random song.
- Position Slider: Shows you the time position of the Active Clip. You can adjust this with your mouse to jump to any position in the song.