


Event Sounds
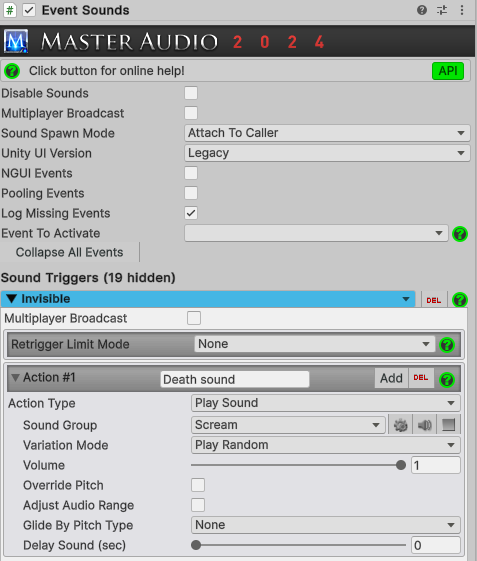
Event Sounds is an extremely powerful and flexible script that you can attach to game objects to trigger Sound Groups (and manipulate Playlists, Buses and more) for certain MonoBehavior, NGUI, PoolBoss (Core GameKit), PoolManager and other events. So even without Playmaker, you have a wide variety of "no coding" actions you can do with Master Audio. Add this script to a game object from the menu: Component -> Dark Tonic -> Master Audio -> Event Sounds. The image below shows Event Sounds with only "Invisible" event activated.
There are 3 main sections to Event Sounds, listed below. Click on the links below to read more about each.
Supported Events
-
MonoBehavior Events:
- OnStart
- OnBecameVisible (see note at bottom)
- OnBecameInvisible (see note at bottom)
- OnEnable (see Timeline note at bottom)
- OnDisable (see Timeline note at bottom)
- OnDestroy
- OnCollisionEnter
- OnCollisionExit
- OnTriggerEnter
- OnTriggerStay
- OnTriggerExit
- OnParticleCollision
- Code-Triggered Event 1 & 2 (see Animation Event note at bottom)
-
2D Events
- OnCollisionEnter2D
- OnCollisionExit2D
- OnTriggerEnter2D
- OnTriggerStay2D
- OnTriggerExit2D
-
Unity Legacy GUI
- OnMouseEnter
- OnMouseExit
- OnMouseDown
- OnMouseDrag
- OnMouseUp
-
uGUI (Unity 4.6 UI). For these to show up, you must place Event Sounds on a game object that has a RectTransform component (any uGUI component).
- Slider Changed (see note at bottom)
- Button Click
- PointerEnter
- PointerExit
- PointerDown
- PointerUp
- Drag
- Scroll
- UpdateSelected
- Select
- Deselect
- Move
- InitializePotentialDrag
- BeginDrag
- EndDrag
- Submit
- Cancel
-
NGUI events: These can be shown by checking the "NGUI Events" checkbox in the top section.
- NGUI Mouse Click
- NGUI Mouse Down
- NGUI Mouse Up
- NGUI Mouse Enter
- NGUI Mouse Exit
-
Pooling events: Works for both Pool Boss (part of Core GameKit) and PoolManager. These can be shown by checking the "Pooling Events" checkbox in the top section.
- OnSpawned
- OnDespawned
- Mechanim State Entered: You can add any number of these. For each one, you specify the name of the Mechanim State that when entered will trigger your actions. This event is only visible if the game object has an Animator component on it.
- Custom Event: You can add any number of Custom Event Receivers to the Event Sounds component. For each one, you specify which Custom Event you're receiving.
Top Section
The following controls are available in this section:
- Disable Sounds: Checking this will disable this script. No sounds will be made from any events.
- Multiplayer Broadcast: This checkbox only appears if you have enabled Multiplayer Capability on the Welcome Window and will make sure that all players in your multiplayer game hear the sounds you configure here. For more detail, consult the Master Audio Multiplayer page.
-
Sound Spawn Mode: This has 2 different choices. Note that only when playing Sound Groups does this setting matter:
- Caller Location: This will trigger Sound Groups from this game object's position.
- Attach To Caller: The default. This will not actually reparent the Variation game object, but it will follow the location of the game object that has the Event Sounds script. This way sounds won't get cut off or Variation objects destroyed when things despawn or get destroyed by Scene changes.
-
Unity UI Version: This has 2 different choices.
- UGUI: The default (Unity 4.6 GUI). This must be selected to see UGUI events in the Event To Activate dropdown.
- Legacy: This is for if you really want to use the old Unity GUI events (pretty bad performance). This must be selected to see Legacy GUI events in the Event To Activate dropdown.
- NGUI Events: Click this to see NGUI events in the Event To Activate dropdown.
- Pooling Events: Click this to see Pool Boss (part of Core GameKit) and PoolManager events in the Event To Activate dropdown.
- Log Missing Events: Defaults to on. If on, this will check for the existence of all Custom Events listened to in Event Sounds and log errors to the Console if not found. If you create Custom Events at runtime (not configured in Master Audio game object, turn this off to avoid false warnings in a "Type In" event in this script.
-
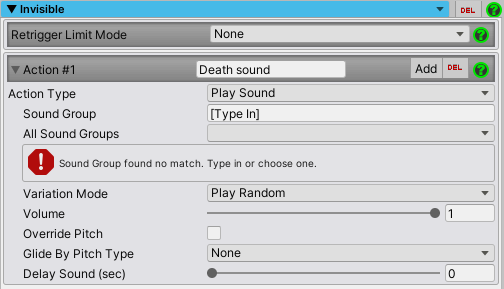
Event To Activate: This holds the list of all supported events you can still add (haven't added yet) to this Event Sounds script. Choose the event that you want to add some audio behavior to from the "Event to Activate" dropdown. This will create a collapsible section underneath for that event, which looks like the image below.
Event Settings Section
The following controls are available in this section:
-
Event Title Bar: The blue bar represents the event and has the following settings:
- Collapse / Expand arrow: Toggles the display of the event's actions and other controls.
- Delete button: Deletes the event.
- Fire button: This will fire the event (actually perform the audio actions) so you don't have to make the event happen naturally from Unity events. Great for testing. Only visible at runtime.
- Layer Filter / Tag Filter: All Trigger and Collision events have layer and tag filters. If you enable these, you can specify which layer(s) and / or tag(s) the object you’re colliding with must be to trigger the actions. If you are using the filter and there is no match, the collision is ignored.
- Multiplayer Broadcast: This checkbox only appears if you are using the premium Master Audio Multiplayer plugin and will make sure that all players in your multiplayer game hear the sounds you configure here. Checking the same named checkbox in the top section will make this one invisible and basically enable it for all events you have setup here. For more detail, consult the Readme included in the MAM plugin.
-
Retrigger Limit Mode: This can be used to prevent the event from performing its actions again until a number of frames or seconds pass since the last time it performed the actions. It has 3 modes:
- None: (The default) Does nothing to limit retriggers.
- Frame Based: This will let you choose the number of frames to wait before retriggering is allowed.
- Time Based: This will let you set the amount of time to wait before retriggering is allowed.
-
Actions: Each event section can have any number of actions and is created with one to start with. When the event occurs, the actions will be executed from top to bottom, but do not wait for the completion of long-running actions such as fading to complete before moving on to the next action.
For example, doing a fade of a Sound Group followed by a Stop action on the same Sound Group does not wait for the fade to finish before stopping the sound. Each action has the following settings:
- Collapse / Expand arrow: Toggles the display of the actions.
- Name: Defaults to "Your action mame". This is for your reference purposes only, to describe what the action is doing.
- Shift Up / Down buttons: Shift this action up or down in the action list. These buttons only appear if you have more than one action.
- Add / Delete buttons: Add another action under this action or delete this action.
-
Action Type: This of this as "action category". Each Action Type has its own list of Commands it can do. There are 10 types:
-
Play Sound: The default. Since there's only 1 Command for this Action Type, there is no Command dropdown. This will play a sound, 2d or 3d, according to your Sound Spawn Mode setting. When this is chosen, the following additional fields appear:
- Sound Group: Choose the Sound Group you want to play from the dropdown.
- Variation Mode: Here your choices are Play Random (the default) or Play Specific. If you choose Play Specific, you can specify the name of the Variation to play.
- Volume: Specify the volume to play the Variation at. Full volume is the default at 1.
- Override Pitch: If you check this box, you can specify the pitch to play the Variation at. Otherwise the pitch specified in the Variation is used.
- Adjust Audio Range: You will see this box if you are using the "Play Sound" Action Type and have a Sound Group selected. If you check this box, you will see a mesh sphere gizmo in Scene View showing the Min / Max distance of the Audio Source for the Sound Group, which you can adjust here. Only 1 gizmo will be shown per Event Sounds script so that it's not confusing, and that's why this checkbox exists. If you check it, it will uncheck the rest in the same Event Sounds script.
-
Glide By Pitch Type: Use this to gradually change the pitch to a new pitch over time. 3 choices:
- None: The default.
- Raise Pitch: Will slowly raise the pitch to the new target pitch.
- Lower Pitch: Will slowly lower the pitch to the new target pitch.
Other Glide By Pitch Fields, visible if you've selected something other than "None" on Glide By Pitch Type:- Raise/Lower Pitch By: This is the amount of pitch to raise or lower by.
- Glide TIme: This is the time it will take to arrive at the new pitch.
- Finished Custom Event: If specified, the Custom Event to fire when the pitch glide is completed.
- Delay Sound (seconds): This allows you to schedule a sound to be played X seconds from now.
-
Group Control: Choosing this will reveal a menu of Group Commands to perform various actions on a Sound Group, some of which have an additional field or two for options. You either choose a Sound Group to execute the command on, or use the checkbox labeled "Do For Every Group?", which will perform the command on every Sound Group. The following Group Commands can be chosen:
-
Fade To Volume: This will fade the volume of a chosen Sound Group to a value you specify, over a period of X seconds. Other controls here include:
- Stop Group After Fade: If checked, will stop the Sound Group after the fade completes.
- Restore Volume After Fade: If checked, will restore the original pre-fade volume to the Sound Group after the fade completes.
- Custom Event After Fade: If checked, you can select a Custom Event to fire after the fade completes, in the Finished Custom Event field below that.
- Fade Out All Of Sound: This will completely fade out the volume of a chosen Sound Group to a value you specify, over a period of X seconds.
- Mute: This will mute a chosen Sound Group.
- Pause: This will pause all currently playing Variations in a chosen Sound Group.
- Solo: This will solo a chosen Sound Group.
- Stop All Of Sound: This will stop all Variations on a chosen Sound Group.
- Unmute: This will unmute a chosen Sound Group.
- Unpause: This will unpause all currently paused Variations in a chosen Sound Group.
- Unsolo: This will unsolo a chosen Sound Group.
- Stop All Sounds Of Transform: This will stop all currently playing Variations of ALL Sound Groups that were triggered by this game object.
- Stop Sound Group Of Transform: This will stop all currently playing Variations of a chosen Sound Group that were triggered by this game object.
- Pause All Sounds Of Transform: This will pause all currently playing Variations of ALL Sound Groups that were triggered by this game object.
- Pause Sound Group Of Transform: This will pause all currently playing Variations of a chosen Sound Group that were triggered by this game object.
- Unpause All Sounds Of Transform: This will unpause all currently paused Variations of ALL Sound Groups that were triggered by this game object.
- Unpause Sound Group Of Transform: This will unpause all currently paused Variations of a chosen Sound Group that were triggered by this game object.
- Fade Out Sound Group Of Transform: This will completely fade out all currently playing Variations of a chosen Sound Group to a value you specify, over a period of X seconds. Only affects Variations that were triggered by this game object.
- Refill Sound Group Pool: This will refill the Sound Group Pool (random or top-to-bottom) so it will start over on the next play.
-
Route To Bus: This will route the Sound Group to a Bus you select in the next field.
- Bus Name: Select the Bus to route to.
-
Glide By Pitch: Use this to gradually change the pitch to a new pitch over time. Other controls here include:
-
Glide By Pitch Type: Use this to gradually change the pitch of playing Variations to a new pitch over time. 3 choices:
- None: The default.
- Raise Pitch: Will slowly raise the pitch to the new target pitch.
- Lower Pitch: Will slowly lower the pitch to the new target pitch.
-
Other Glide By Pitch Fields, visible if you've selected something other than "None" on Glide By Pitch Type:
- Raise/Lower Pitch By: This is the amount of pitch to raise or lower by.
- Glide TIme: This is the time it will take to arrive at the new pitch.
- Finished Custom Event: If specified, the Custom Event to fire when the pitch glide is completed.
-
Glide By Pitch Type: Use this to gradually change the pitch of playing Variations to a new pitch over time. 3 choices:
- Toggle Sound Group: This will play a Sound Group if it's not playing, or stop it if it is.
- Toggle Sound Group Of Transform: This will play a Sound Group if it's not played from a Transform, and stop it if it is.
- Fade Out All Sounds Of Transform: This will fade out all the currently playing Variations from all Sound Groups played by a Transform.
-
Stop Old Sound Group Voices: This will stop all the currently playing Variations from the selected Sound Group that have been playing more than X seconds, where you define X.
- Min Age: The minimum time a clip must have played to be stopped.
-
Fade Out Old Sound Group Voices: This will fade out all the currently playing Variations from the selected Sound Group that have been playing more than X seconds, where you define X.
- Min Age: The minimum time a clip must have played to be faded.
-
Fade To Volume: This will fade the volume of a chosen Sound Group to a value you specify, over a period of X seconds. Other controls here include:
-
Bus Control: Choosing this will reveal a menu of Bus Commands to perform various Bus actions, some of which have an additional field or two for options. You either choose a Bus to execute the command on, or use the checkbox labeled "Do For Every Bus?", which if checked will perform the command on every Bus. The following Bus Commands can be chosen:
-
Fade to Volume: This will fade the volume of a chosen Bus to a value you specify, over a period of X seconds. Other controls here include:
- Stop Bus After Fade: If checked, will stop the Bus after the fade completes.
- Restore Volume After Fade: If checked, will restore the original pre-fade volume to the Bus after the fade completes.
- Custom Event After Fade: If checked, you can select a Custom Event to fire after the fade completes, in the Finished Custom Event field below that.
- Mute: This will mute a chosen Bus.
- Pause: This will pause all currently playing Variations in Sound Groups assigned to a chosen Bus.
- Solo: This will solo a chosen Bus.
- Stop: This performs
Stop All Of Soundon every Sound Group assigned to a chosen Bus. - Unmute: This unmutes a chosen Bus.
- Unpause: This will unpause all currently paused Variations in Sound Groups assigned to a chosen Bus.
- Unsolo: This will unsolo a chosen Bus.
- Change Pitch: This will change the pitch of all Variations in Sound Groups assigned to a chosen Bus.
- Toggle Mute: This will mute the bus if not muted. If muted already, it will unmute.
- Pause Bus Of Transform: This will pause all currently playing Variations in all Sound Groups assigned to a chosen Bus that were played from this Transform.
- Unpause Bus Of Transform: This will unpause all paused Variations in all Sound Groups assigned to a chosen Bus that were played from this Transform.
- Stop Bus Of Transform: This will stop all paused or playing Variations in all Sound Groups assigned to a chosen Bus that were played from this Transform.
-
Glide By Pitch Type: Use this to gradually change the pitch of playing Variations to a new pitch over time. 3 choices:
- None: The default.
- Raise Pitch: Will slowly raise the pitch to the new target pitch.
- Lower Pitch: Will slowly lower the pitch to the new target pitch.
Other Glide By Pitch Fields, visible if you've selected something other than "None" on Glide By Pitch Type:- Raise/Lower Pitch By: This is the amount of pitch to raise or lower by.
- Glide TIme: This is the time it will take to arrive at the new pitch.
- Finished Custom Event: If specified, the Custom Event to fire when the pitch glide is completed.
- Toggle Sound Group: This will play the Sound Group if it's not currently playing, and stop it if it is.
- Toggle Sound Group Of Transform: This will play the Sound Group if the Transform is not currently playing it, and stop it if it is.
-
Stop Old Bus Voices: This will stop all the currently playing Variations from Sound Groups on the selected Bus that have been playing more than X seconds, where you define X.
- Min Age: The minimum time a clip must have played to be stopped.
-
Fade Out Old Bus Voices: This will fade out all the currently playing Variations from Sound Groups on the selected Bus that have been playing more than X seconds, where you define X.
- Min Age: The minimum time a clip must have played to be faded.
-
Fade to Volume: This will fade the volume of a chosen Bus to a value you specify, over a period of X seconds. Other controls here include:
-
Playlist Control: Choosing this will reveal a menu of Playlist Commands to perform various Playlist actions, some of which have an additional field or two for options. You either choose a Playlist Controller to execute the command on, or use the checkbox labeled "All Playlist Controllers?", which if checked will perform the command on every Playlist Controller. Not every command has this option. Playlist Controller Name is optional if you have only one of them. The following Playlist Commands can be chosen:
- Change Playlist (by name): This will change the Playlist of a chosen Playlist Controller. You also have the option of starting the new Playlist.
- Fade to Volume: This will fade the volume of a chosen Playlist Controller to a value you specify, over a period of X seconds.
- Play Clip: This will play a clip of your choice (by name or Alias) from the current Playlist in a chosen Playlist Controller.
- Play Random Song: This will play a random song from the current Playlist in a chosen Playlist Controller.
- Play Next Song: This will play the next song from the current Playlist in a chosen Playlist Controller.
- Pause: This will pause the Playlist in a chosen Playlist Controller.
- Resume: This will unpause the Playlist in a chosen Playlist Controller.
- Stop: This will stop the Playlist in a chosen Playlist Controller.
- Restart: This will restart the Playlist in a chosen Playlist Controller.
- Stop Looping Current Song: This will turn loop off for the current playing song and play the next song in the Playlist when done.
- Stop Playlist After Current Song: This will stop the Playlist after the current song is done. Turns off auto-advance, clears any queued songs and turns looping off for the current song to make sure.
- Add Song To Queue: This will add a song to the queue to be played after the current song.
-
Custom Event Control: Choosing this will reveal a menu of Custom Event Commands. The following Custom Event Commands can be chosen:
-
Fire Event: This will fire the Custom Event you specify, and all Custom Event Receivers (Event Sounds can be used for this - see list of supported events up top) in the Scene that are configured to receive the event will respond.
Note: when receiving Custom Events, if you are receiving multiple events in a single Event Sounds component, you can sort them alphabetically with a button in the top section labeled "Alpha Sort Custom Event Triggers".
-
Fire Event: This will fire the Custom Event you specify, and all Custom Event Receivers (Event Sounds can be used for this - see list of supported events up top) in the Scene that are configured to receive the event will respond.
-
Global Control: Choosing this will reveal a menu of Global Commands. "Mixer" commands affect all Sound Groups in the Group Mixer at once. "Everything" commands affect all Sound Groups and Playlist Controllers as well. The following Global Commands can be chosen:
- Pause Mixer: This will pause all currently playing Variations in all Sound Groups in the Group Mixer.
- Unpause Mixer: This will unpause all currently paused Variations in all Sound Groups in the Group Mixer.
-
Stop Mixer: This performs
Stop All Of Soundon all Sound Groups in the Group Mixer. -
Stop Everything: This performs
Stop Mixer(above) and also stops all Playlist Controllers. -
Pause Everything: This performs
Pause Mixer(above) and also pauses all Playlist Controllers. -
Unpause Everything: This performs
Unpause Mixer(above) and also unpauses all Playlist Controllers. - Mute Everything: This mutes all Sound Groups in the Group Mixer, and also mutes all Playlist Controllers.
- Unmute Everything: This unmutes all Sound Groups in the Group Mixer, and also unmutes all Playlist Controllers.
- Pause Audio Listener: This pauses the Audio Listener so you will hear nothing during the time it's puased, unless it is marked as "Ignore Listener Pause".
- Unpause Audio Listener: This unpauses a paused Audio Listener so you can hear audio again.
-
Unity Mixer Control: Requires a Unity Mixer asset. This lets you Transition to Snapshots you create in a Unity Mixer. The following Unity Mixer Commands can be chosen:
- Transition To Snapshot: This will transition to a Snapshot over a period of X seconds.
- Transition To Snapshot Blend: This will transition to a weight blend of multiple Snapshots over a period of X seconds.
-
Persistent Settings Control: This lets you set Persistent Settings. The last 4 are controls visible at the top of the Master Audio game object. The following Persistent Settings Commands can be chosen:
- Set Bus Volume: This will set the volume of a Bus in a persistent manner.
- Set Group Volume: This will set the volume of a Sound Group in a persistent manner.
- Set Mixer Volume: This will set the Master Mixer Volume in a persistent manner.
- Set Music Volume: This will set the Master Playlist Volume in a persistent manner.
- Mixer Mute Toggle: This will toggle the mute status of the entire Group Mixer in a persistent manner.
- Music Mute Toggle: This will toggle the mute status of all music in a persistent manner.
-
Parameter Control: This lets you set Parameter values. The following Parameter Commands can be chosen:
- Update Real Time Parameter: This will set the value of a Parameter to what you specify.
-
Parameter Command Control: This lets you invoke and stop Parameter Commands. The following Parameter Cmd Commands can be chosen:
- Invoke Parameter Command: This will invoke a Parameter Command.
- Stop Parameter Commands Of Transform: This will stop all of a named Parameter Command made by this game object.
- Stop All Of Parameter Command: This will stop all Parameter Commands of a named type.
-
Play Sound: The default. Since there's only 1 Command for this Action Type, there is no Command dropdown. This will play a sound, 2d or 3d, according to your Sound Spawn Mode setting. When this is chosen, the following additional fields appear: