

The Master Audio Game Object
The Master Audio game object, which is the first you will create from the Master Audio Manager window, controls most settings for the Master Audio plugin.
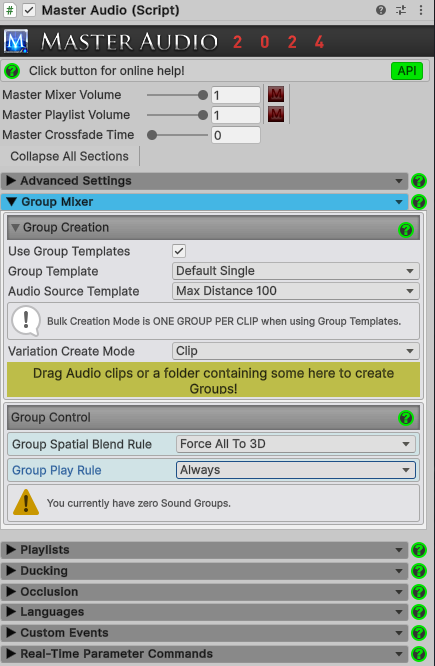
There are a few global controls at the top, the first two of which can be permanently set by Persistent Settings. You can control most of this section with the Global Commands section of Event Sounds script with no coding!
- Master Mixer Volume: This controls the volume of all sound effects coming out of Master Audio. The volume for an individual sound effect being played is calculated as:
(audio clip volume)X(group volume)X(bus volume - if any)X(master mixer volume)Buttons: Mute, stop, pause and unpause. These will affect ALL Sound Groups! Only the mute button appears during edit time, the rest are visible during run time.Read more about Buses and Sound Groups below in the Group Mixer section below. - Master Playlist Volume: This is the master volume for all Playlists. A Playlist clip volume is calculated as:
(audio clip volume)X(playlist volume)X(master playlist volume).Buttons: Mute, stop, pause and unpause. These will affect music in all Playlist Controllers! Only the mute button appears during edit time, the rest are visible during run time.Read more about Playlists in the Playlist Settings section below. - Master Crossfade Time: This is the amount of time songs will spend crossfading when you change to a new song. You can override this per Playlist if you want to.
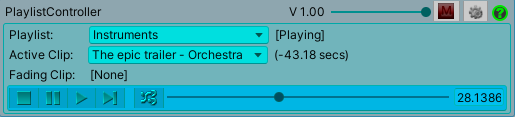
- Jukeboxes: During Play mode, a Jukebox will show up for each Playlist Controller in the Scene showing the active song and other controls. If you have more than one Jukebox, a filter will appear above them with the choices "Display All" (default) and "Display Active". Display Active will hide any Jukeboxes not playing audio. Click the gear icon to navigate to the Playlist Controller.
Collapsible Sections
In addition, there are several collapsible sections (shown in the graphic above) that organize the major features into categories. There's also a Collapse All button to collapse all the sections.
- Languages: This section is for the optional Localization feature which uses a standard naming convention for Resource File folders to play sound effects in the user's selected language automatically. Read more about setting up Localization here.
- Advanced Settings: This section contains many options for diagnostic logging, gapless music switching, saving changes applied at runtime, and a lot more. Read more about Advanced Settings here.
- Audio Ducking: This section contains controls for a very simple-to-use audio ducking system. Read more about how to set up ducking here.
- Video Player Settings: Only visible if you are on Unity 2019.3+. Allows integration with Unity Video Player and allows you to route them through a Master Audio Bus. Read more about Video Player Settings here.
- Group Mixer: This section contains the Group Mixer, which is responsible for setting up all sound effects, organized into Sound Groups each containing 1 or more Variations. There are a plethora of options available for your Sound Groups. You can also route the Sound Groups through Buses and route Buses into channels on a Unity Mixer. Read more about the Group Mixer here.
- Playlist Settings: In this section, you will set up your Playlists and Playlist Controllers. A Playlist is a set of songs and a Playlist Controller can host one Playlist at a time. Read more about Playlist Settings here.
- Custom Events: This section allows you to set up Custom Events. These are useful to create complex audio reaction to a single event and require no coding to use most of the time. Read more about Custom Events here.