


Master Audio Manager
This window is launched from the Unity Window menu: select Master Audio -> Master Audio Manager. This is a small window that will help explain and set up what you need for Master Audio. It is important to use this window to create the prefab and not just drag them into the Scene from where are located. This way they will not be linked to the prefabs in the plugin folder, and so will not have their settings erased when you upgrade Master Audio to a newer version.
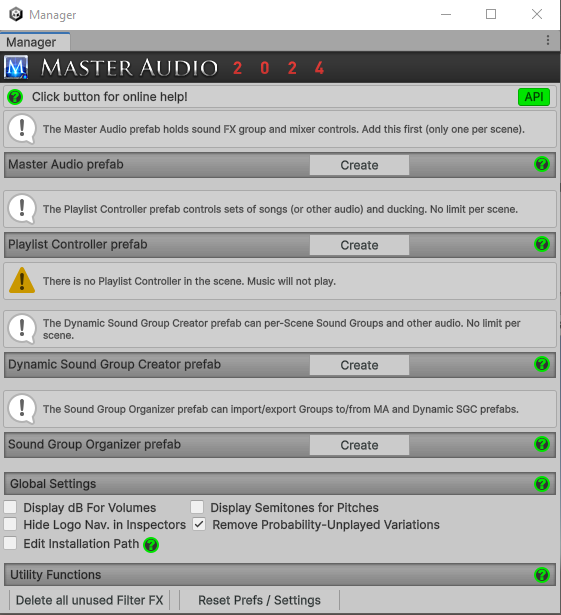
Prefab Creation
There are 4 main prefabs you may want to create. This outlines their uses.
- Master Audio: The Master Audio game object is always needed for sound effects and to set up Playlists. The position of the Master Audio game object will be used for any sounds that you don't provide a position to (usually only used with 2D sounds which aren't positional anyway) and for previewing sounds. The Master Audio game object will have a "M" icon in the Hierarchy.
- Playlist Controller: These handle playing music in Playlists with crossfading and layer synchronization. You can create 1 or more Playlist Controller game object. Each Playlist Controller game object will have an icon with 2 blue 8th notes in the Hierarchy.
- Dynamic Sound Group Creator: The DGSC is used for per-scene audio and lets you specify them without writing any code. This enables "audio skins" and dynamic creation of audio items.
- Sound Group Organizer: This is used to import/export Sound Groups to different Scenes without having to recreate them or perform "prefab surgery".
Global Settings
Some settings here are of interest to professional audio engineers. These settings are stored in a Scriptable Object named MasterAudioSettings.
- Display dB For Volumes: If you prefer to use dB (decibels) for volume displays, check this checkbox. This will show every single volume control as a dB number instead of the default Unity 0-1 range.
- Display Semitones for Pitches: If you prefer to use semitones / cents for pitch displays, check this checkbox.
- Hide Logo Nav. in Inspectors: There's an option to turn off the Master Audio logo in all Inspectors if you really need the real estate. Clicking on that logo in any Inspector also will navigate to the Master Audio game object in the Scene, if any, so it is a useful thing to have.
- Edit Installation Path: Check the box if you have moved Master Audio from its default location. Read more about this here.
- Remove Probability-Unplayed Variations: Defaults to on. If you turn it off, Variations that aren't played due to failing the Probability To Play check will not be removed from the pool, so they may be played again later through another probability check.
Utility Functions
- Delete all unused Filter FX: This will scan the entire Master Audio game object for Variations with Filter FX that are disabled and delete them.
- Reset Prefs / Settings: Clicking this will delete all Master Audio settings stored in PlayerPrefs such as all Persistent Settings, some Advanced Settings (Resources / Fading and Visual settings) and reset the rest of the settings on Master Audio Manager window, which are stored in a Scriptable Object named MasterAudioSettings.