

Localization
There are two approaches to Localization. The first, which supports all Audio Origins, is to use Dynamic Sound Group Creators, as described there, and does not use any settings described on this page. The second approach is described below.
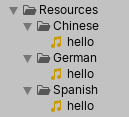
Localization is an optional feature for multi-language audio and requires the use of Resource Files, which is one of the support Audio Origins. When you are using Resource File clips for sound effects, Master Audio can automatically play clips in the language that the user has selected on their device if you follow these guidelines. For localization in Master Audio, you must create a top-level folder (under a folder named "Resources" located anywhere) for each language you will support.
i.e. (English / German). Resource Files are used to reduce the memory used. Only audio files in the language your user has selected will be loaded when they need to be played, then promptly unloaded after they're done playing.
The steps below will walk you through how to set up multi-language audio. Check out the LocalizationScene included in the ExampleScenes folder for a working preview.

- Click on your Master Audio game object. Expand the Languages section up top to see the settings. The image above is shown for reference. The following fields displayed in that section:
-
Supported Languages: Here you select the languages you want to support (i.e. German / French / Chinese / English). Make sure to then create a folder with the same name as each language you selected under a folder called "Resources" (i.e.
Resources/English,Resources/German, etc). Use the Add and Del buttons to add or delete a new language to/from the list. - Default Language: This language will be used if a user has their device set to a language that you don't support. The Default Language should be one of the languages you selected in Supported Languages. For example, let's say you have selected German and English, with German as the Default Language. Now a user has their iPad set to French. Since you don't support French, it will use English as the language.
- Language Mode: This has 3 choices.
- Use Device Setting: This will try to use the language the user has selected on their device. This is the normal setting you would use for releasing games. If it's one of languages you support, it will load clips of that language. If it's not, it will load clips of your Default Language instead. The user's Default Language will be retrieved from Application.systemLanguage at runtime.
- Specific Language: If you select this, another field "Use Specific Language" will show up underneath, allowing you to tell Master Audio "always use the language I select here". This is useful for test listening to another language. Make sure to switch Language Mode back before you release if you want multiple languages to work again!
- Dynamically Set: If you select this, you must tell Master Audio which language to use via code (maybe you are allowing the user to select from a few languages). The code to set the language is as follows:
MasterAudio.DynamicLanguage = SystemLanguage.German;Note: The limitation on this is that you must set the language in a previous Scene that doesn't share the same Master Audio game object (like a main menu scene). In the next Scene, the other Master Audio game object will pick up the language you have set during the Awake event.
-
Supported Languages: Here you select the languages you want to support (i.e. German / French / Chinese / English). Make sure to then create a folder with the same name as each language you selected under a folder called "Resources" (i.e.
- Obtain or create sound files (for each language you support) for each Audio Clip you want to localize. All clips of the same meaning must have the same file name and should be placed in the correct language-named folder. That's the limitation to make it work. So if you are making 3 versions of a "Hello" sound clip, you might place one in the following folders, depending on languages supported:
Resources/German/Hello.wavResources/English/Hello.wavResources/French/Hello.wav
- Go back to the Master Audio game object and set Variation Create Mode (under the Mixer section) to Resource File.
- Create a new Sound Group called "Hello" by dragging in one of the 3 Hello.wav files in your language-named Resource folders. Now click on the gear (settings icon) in the mixer row for your new Hello group. Notice that the "Use Localized Folder" checkbox is checked because Master Audio recognized that you dragged a file from a language-named folder ("English", "French", or "German" are the ones you have).
- When the Use Localized Folder checkbox is checked, this Variation is now considered localized and Master Audio will attempt to play the correct language Audio Clip when you preview or play that Variation at runtime. If you are missing an audio file for that language, an error will be logged to let you know. For example, if you forgot to make
Resources/French/Hello.wavand played the Hello sound using the French language, you would get an error.
- When the Use Localized Folder checkbox is checked, this Variation is now considered localized and Master Audio will attempt to play the correct language Audio Clip when you preview or play that Variation at runtime. If you are missing an audio file for that language, an error will be logged to let you know. For example, if you forgot to make
- In the case that you have a Dynamic Sound Group Creator game object in a Scene that has no Master Audio game object (common with Bootstrapper Scene setup), Dynamic SGC will have a "Preview Language" field so that you can preview your audio in a certain language. At runtime, the Dynamic SGC will populate its configured items into the persisted Master Audio game object, so you can preview or play as normal from the Master Audio game object during runtime.