


Master Audio Multiplayer
You now have extensive turnkey multiplayer features to go along with the massive power of Master Audio, whether you use FishNet, Mirror or Photon! Your dynamic audio will be heard by all players without having to write any code in most cases just by you clicking a checkbox! This gives you the tools to choose which audio is heard by all players in all cases, regardless of which other networking code you may or may not have with your other non-audio code (more on this later).
If Using FishNet, Take These Steps Next
In order to use Master Audio Multiplayer with FishNet, you must have a copy of the following plugin installed in your project: FishNet (any version will do, including the free version).
Install the "MAM_FishNet" package in Assets\Plugins\DarkTonic\MasterAudioMultiplayer\Packages. By default a non-functioning version of the multiplayer code is installed, since Unity deprecated UNET in Unity 2019. The package will overwrite a single code file with FishNet specific code.
Everything should be compiling fine at this point.
If Using Photon, Take These Steps Next
In order to use Master Audio Multiplayer with Photon, you must have a copy of the following plugin installed in your project: Photon Unity Networking (any version will do, including the free version). Also works with Photon 2!
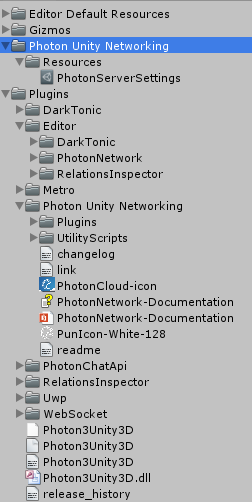
All DarkTonic plugins are installed in the Assets/Plugins folder (as is the recommended option for all Editor Extensions because it speeds up compile time), so you will need to move Photon into Assets/Plugins as well so things will compile after you install Master Audio Multiplayer. To do this, perform the following steps from within Unity:
-
In the Project view, drag the entire
Photonfolder (in the top-level folder) intoAssets/Plugins. -
If you have a
Photon Chatfolder in the top-level folder too, drag that intoAssets/Pluginsas well. -
In the
Assets/Pluginsfolder, Editor files need to be in a precise location, so we need to make one more change. Locate the folder you just dragged, in theAssets/Plugins/Photon Unity Networkingfolder, and expand it. Also expand the Code folder located under that. Now drag theEditorfolder there up into theAssets/Plugins/Editorfolder instead ofPlugins/Photon Unity Networking/Editor. Finally, rename your dragged folder to "PhotonUnityNetworking". That will be atAssets/Plugins/Editor/Photon Unity Networkingwhen you are finished.
Note: if you have other code referencing the Photon API, you will need to move those scripts intoPluginsas well. However, this is great for compile time because only when code in Plugins is modified will the code in Plugins have to be recompiled. -
Finally, install the ""MAM_Photon" package in
Assets\Plugins\DarkTonic\MasterAudioMultiplayer\Packages. By default a non-functioning version of the multiplayer code is installed, since Unity deprecated UNET in Unity 2019. The package will overwrite a single code file with Photon specific code. If you need PUN 2, instead install "MAM_Photon_2".
Note: There's also a package "MAM_UNET" in the same folder if you want to use UNET, but know that it is deprecated start in Unity 2019 and may stop working at any moment.
You will now have a Project View with the following and everything should be compiling fine:
If Using Mirror, Take These Steps Next
In order to use multiplayer features with Mirror, you must have a copy of the following plugin installed in your project: Mirror (I prefer to install it from the Unity Asset Store).
-
Install the "MAM_Mirror" package in
Plugins/DarkTonic/MasterAudioMultiplayer/Packages. By default a non-functioning version of the multiplayer code is installed, since Unity deprecated UNET in Unity 2019. The package will overwrite a single file of Master Audio with Mirror specific code.
Note: There's also a package "MAM_UNET" in the same folder if you want to use UNET, but know that it is deprecated start in Unity 2019 and may stop working at any moment.
You will now have everything compiling fine.
Scene Setup & Requirements To Use
In order to get this plugin to work properly for multiplayer audio, regardless of whether you're writing code or using the supplied scripts, you will need to make sure of 2 things.
- First, go to your Master Audio Game Object (all of them if you have them in different Scenes) and add the MasterAudioMultiplayerAdapter script to it. It will also automatically add a Network Observer (FishNet), Photon View (Photon), or NetworkIdentity (Mirror / UNET) component, which it needs to perform the networking code.
- In order for a GameObject to be able to use the Multiplayer Broadcast checkbox in its scripts when checked (or to call MasterAudioMultiplayerAdapter via your scripts), the only requirement is that the same game object, or ANY of its parent Game Objects must have a Network Object, Photon View or NetworkIdentity component on it (depending on which networking plugin you are using). The closest Network Object, Photon View, or NetworkIdentity will be used to see if and where to send the networking code, before executing it. It may go to client or server. You don't really need to worry about this part. This code is there because all clients may try and execute the same audio code at the same time, and this ensures that only one of them actually does.
Note: For FishNet and Mirror, if you are using additive Scenes with the Master Audio game object in the original scene, you will need to Network Instantiate it (Master Audio game object) instead of just having it in the Scene or it may stop working when you load a new Scene.
How to Use the Multiplayer Features, Without Coding
If you are using the built in Master Audio scripts of Event Sounds, Mechanim State Sounds or Mechanim State Custom Events, there will be a new checkbox in the Inspector labeled "Multiplayer Broadcast", shown below.
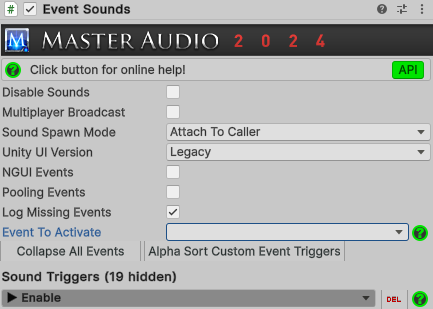
In the most simple usage, if you simply check that box, everything will "just work" and be heard on all clients (all players playing in the same "room"). For the Event Sounds script, you can check that checkbox in the top section, which means it will apply to all events you have configured in Event Sounds for that Game Object. If that's not what you want, the same Multiplayer Broadcast checkbox will appear on each event if you haven't checked it above, for more granular control.
It's worth mentioning that in some cases, it will not be necessary to check the Multiplayer Broadcast checkbox because things will already be heard on all clients without it. But that depends entirely on your setup.
Some examples for Event Sounds script:
- If you are using the Start event to play some audio, that should normally occur naturally on all clients since they have to Instantiate the game objects as well for network propagation to work (unless you are using a Pooling plugin such as PoolBoss in which case using the OnSpawned event would also work properly). Note that using the Start event on Game Objects that are already in the Scene when it starts (for things such as ambient sounds) would not require "Multiplayer Broadcast" either since all clients will run that code automatically.
- If you are using the OnCollision or OnTrigger events, that may or may not happen on all clients due to a lag in frame rate and completely passing over the collider during a move. So I'd recommend ticking the Multiplayer Broadcast box in that case.
- If you are using the OnBecameVisible (or OnBecameInvisible) events - yes they will happen on all clients, but at probably different times because that player's camera may be in different locations. So if you want that to happen when for each player's camera judges it as having become visible or invisible, don't use the Multiplayer Broadcast checkbox. If you want it to be heard by everyone as soon as the owner's camera judges it as having become visible or invisible, then tick the Multiplayer Broadcast checkbox.
- Depending on how your Mechanim State Replication works, you may or may not need to check the Multiplayer Broadcast checkbox to get the sounds to reliably be heard by all players. It's there if you need it.
In most other cases, you will want to tick the Multiplayer Broadcast checkbox, but you can always test it without and add it later if needed.
Note: When sending a Custom Event, it saves bandwidth to send the Custom Event itself with Multiplayer Broadcast. That way, you only send the single event (Custom Event networking code) across the wire, and each audio event that a Game Object executes when listening to that Custom Event won't need to be sent across the wire at all since they will execute on all clients. i.e. if your Custom Event Listener performs 3 audio events and you ticked Multiplayer Broadcast on the Custom Event Listener event instead of the Custom Event sending event, you'd be sending 3 network calls instead of 1 doing it the other way.
How to Use the Multiplayer Features, With Coding
Basically you will be using the static methods in the MasterAudioMultiplayerAdapter class instead of the ones in the MasterAudio class. The methods in both are mostly named identically but all require a Transform parameter to be passed in telling it the Game Object that is making the sound (named "Actor"). This is so that Multiplayer Master Audio can determine if the call is coming from the owner of a network object or not. If it is not, networking code will not be sent across the wire and the call will be ignored. This is necessary to have everything working "auto-magically" and not have anything superfluous sent across the wire.
For example, instead of calling MasterAudio.StopAllOfSound, you would instead call MasterAudioMultiplayerAdapter.StopAllOfSound, and it will magically be done on all clients. If you want to examine some code, Event Sounds script conditionally calls either one depending on whether you have checked "Multiplayer Broadcast" or not.
Please consult the API website here if you can't find what you're looking for.
Single Player Fallback
In the following cases, MasterAudioMultiplayerAdapter will execute all audio events on the caller client only, so you can still test in single player mode without changing any code:
For FishNet:
- No other players are connected.
- Server has not been started.
- If local client is not active on the server.
For Photon:
- Photon is in offline mode.
- No other players are connected.
- Photon is in online mode but not yet connected.
For Mirror / UNET:
- No other players are connected.
- Server has not been started.
- If local client is not active on the server.
Errors and Troubleshooting
There are a couple checkboxes on the MasterAudioMultiplayerAdapter for troubleshooting. You may wish to turn them on if something is failing and it will log clues to the Console window that may help to let you know why.
- Log Diagnostics - turning this on will log messages on both the originating client and the receiving clients (if it's indeed sent across the network, passing the "owner check").
- Check Target Client Name - turning this on is for troubleshooting the exact target Game Object on each client (that should match the originating client's Game Object).
When sending any bug reports to DarkTonic, make sure and include what is in the Console window for originating client and target client if applicable.