
Syncro Spawners
Syncro Spawners are used to spawn things from the Global Wave settings on LevelWaveSettings. You can have 1 or more Spawners each with their own individual Waves configured for each Global Wave. Each Spawner can have any number of Waves. This is what is looks like with a couple Waves already set up.
There are 2 sections of controls:
- Top Section: Settings that apply to the Spawner itself.
- Wave Settings: Settings for each Wave in the Spawner.
Top Section
-
Active Mode: This controls when the Spawner is active. There are four choices:
- Always: The default.
- Never: Disable the Spawner entirely.
- If World Variable In Range: This lets you define a range for a World Variable value that must be satisfied for the Spawner to be active. For example, the Spawner will be active if your experience points is between 1000 and 2000.
- If World Variable Outside Range: Opposite of "In Range". This will let you not have to worry about upper limits. For example you could say a Spawner is active if outside the range of 0-1000 XP. So it will start to show up after you reach 1000 no matter how many experience points you get.
- Game Over Behavior: This setting allows you to choose whether the Spawner continues to function when "Game Over" is true. Choose "Behave As Normal" if you want this, otherwise it will disable.
- Wave Pause Behavior: This setting allows you to choose whether the Spawner continues to function when Global Waves are paused. Choose "Behave As Normal" if you want this, otherwise it will stop spawning.
- Spawn Outside Pool: Check this if you want the items spawned to have no parent in the Hierarchy. Otherwise they will spawn as a child of Pool Boss.
- Listener: Here you can drag in a WaveSyncroSpawnerListener to hook into key events and do customized coding. For more about Listeners go here.
-
Master Audio Sounds: This section only visible with Master Audio integration because it uses Master Audio.
- Item Spawned Sound: This plays a Sound Group of your choice when an item is spawned.
- Item Failed To Spawn Sound: This plays a Sound Group of your choice when an item fails for spawn.
- Wave Finished Spawning Sound: This plays a Sound Group of your choice when a wave finishes spawning.
- Wave Start Sound: This plays a Sound Group of your choice when a wave starts.
- Elim. Wave Completed Sound: This plays a Sound Group of your choice when an elimination wave is completed.
- Wave Repeat Sound: This plays a Sound Group of your choice when a wave repeats.
-
Spawn Layer / Tag Mode: These let you control what Layer / Tag the spawns take on as they are spawned. 3 choices:
- Use Spawn Prefab Setting: Keep the prefab's Layer or Tag.
- Use Spawner Settings: Use the Layer or Tag of the Spawner itself.
-
Custom: Specify any Layer / Tag you like, choosing it below.
- Custom Spawn Layer / Tag: Pick the Layer or Tag you want here.
- Apply Layer Recursively: this appears in some Spawn Layer Modes and lets you apply the selected Layer to all sub-Game Objects as well.
-
Use Filter: Check this to use the filter.
- Level Filter: Pick a Level from the dropdown to filter out all Spawner Waves that aren't in that Level.
-
Copy Waves To Spawners: Check this to make the following controls appear, allowing you to copy / move Waves from this Spawner to multiple other Spawners:
- Source Waves: Select All / Clear All buttons. A checkbox will appear next to each Wave under Wave Settings further down so you can select source Waves to copy / move.
- Target Spawners: Select All / Clear All buttons and rows of target Spawners with a checkbox next to each to select it.
- Copy / Move Button: These buttons appear if you have selected at least one source Wave and one target Spawner. The effect of both is the same except the Move will delete the Wave from this Spawner after copying it.
Wave Settings
Top Level Controls for this section:
-
Title Bar Controls: Buttons and Icons that do the following:
- Collapse / Expand buttons: Colapse / Expand all Waves.
- Sort Level/Wave Button: Sorts all Waves according to Level# first, Wave# second.
- Add Button: Adds a Wave at the end.
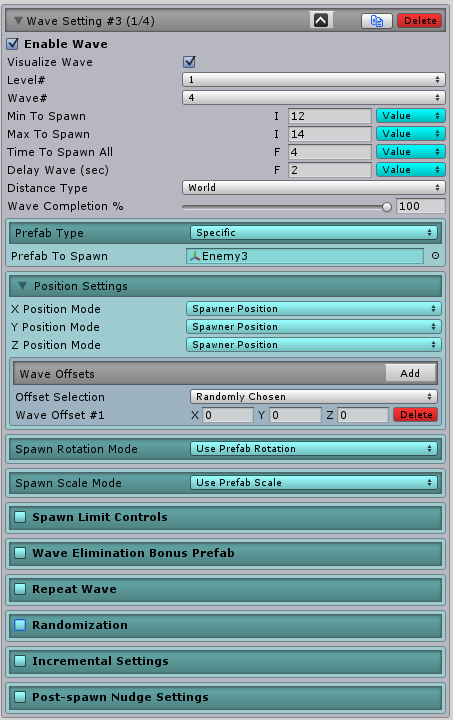
Each Wave in the spawner has the following settings:
-
Title Bar Controls: Buttons and Icons that do the following:
- Shift Up / Down Icon: Use these icons to re-order your Spawner Waves, for your preference only.
-
Clone Icon: Creates a copy of the Wave just after this Wave.
After cloning, you will need to change the Level / Wave combination because it must be unique between all Waves in each Spawner. - Delete Button: Deletes the Wave.
- Enable Wave: Unchecking this deactivates the Wave on this Spawner.
-
Visualize Wave: Checked by default. When checked, this will show you the spawned items in the Scene and Game view as you tweak the values (in Edit mode only) so you can see the shape of the wave. When you hit play, the Game Objects created for visualization will be deleted during Play mode and return when you press stop. Items created for visualization purposes will have an eye icon on the far right in the Hierarchy so you know why they are there.
Limitations: Random prefabs from Prefab Pools cannot be calculated in Edit mode, so spheres will be shown for visualization purposes if you have a Prefab Pool selected. Time options are also not shown (Time to Spawn, Spawn Limit Controls, etc). Min to Spawn alone is used for the number of items shown. Note that a max of 100 items per wave will be visualized. -
Level # and Wave#: These specify which Global Wave / Level you want the Spawner to spawn during. The dropdowns for these show only Levels & Waves that exist in LevelWaveSettings. Whenever you change the Level of a Spawner Wave, the Wave# resets to Wave 1.
Note: Waves and Levels that are deleted from LevelWaveSettings automatically have their Wave Settings deleted from all Spawners. Also, whenever you insert or add a new Wave or Level in LevelWaveSettings, the Wave Settings of all Spawners will be adjusted to stay with the correct Level and Wave. - Min / Max To Spawn: A random number between these two numbers will be chosen for how many of your prefab to spawn.
- Time To Spawn All: This is the length of time it will take to spawn all of your prefab. So if you specify 20 for Min to spawn and Max to spawn, and 2 for Time To Spawn All, it will spawn 10 per second for 2 seconds. This will not be able to be set higher than the Wave duration in LevelWaveSettings. If you use Spawn Limit Controls, then think of this as the *minimum* time to spawn all, as the Spawn Limit Controls may make it take longer.
- Delay Wave (sec): This is used to delay the Spawner wave later than the precise Wave change in LevelSettings. Just set this to how long you wish to delay the first spawn in seconds. Note that Wave Repeats do not use this to delay the repeated wave unless you check the next checkbox.
- Use Wave Delay On Repeat: Check this box for Wave Repeat to also use the Delay Wave setting. Only visible if Wave Repeat is on.
- Distance Type: Choose either Local or World. World is the default. Set it to Local to apply the randomization / incremental / offset settings taking into account the spawner's rotation.
- Wave Completion %: This field only appears if the Wave you are configuring is during a Global Elimination Wave. The default is 100%, but here you can specify that the Spawner's Wave is complete if X% of the items spawned are killed or despawned.
-
Prefab Type: 2 choices.
-
Specific: The default. You will select a prefab to spawn.
-
Prefab To Spawn: This is the prefab you will be spawning copies of.
Note: If you have not set up this prefab in Pool Boss, the following section will appear in the Inspector letting you do it without leaving the current Inspector, as long as the Category you want to add it to already exists. This is a time saver. Just create the Categories up front if you can in Pool Boss. Read more here. 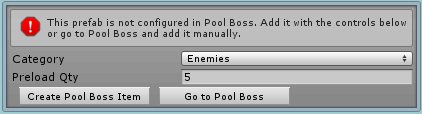
-
Prefab To Spawn: This is the prefab you will be spawning copies of.
-
Prefab Pool: You will use a Prefab Pool for a weighted group of prefabs instead of a single one.
- Prefab Pool: Select one of your already created Prefab Pools from the dropdown. There is a gear icon to the right that you can click to navigate to the Prefab Pool and make changes.
-
Specific: The default. You will select a prefab to spawn.
-
Position Settings:
- X/Y/Z Position Mode: Choose Spawner Position, Custom Position (type a Vector3) or Other Object Position (drag a Game Object in to use its position). Each axis lets you use a number, a variable or the Spawner's position for spawning.
-
Offset Selection: This controls how the Wave Offsets (next) are used by each successive item that is spawned. 2 choices:
- Randomly Chosen: The default, will choose a random one each time.
- Use In Order: Will cycle the usage of each, starting with the first, top to bottom.
- Wave Offsets: This is a group of Vector3's. At runtime, these are chosen and added to the Spawner's position before any Incremental or Post-Spawn nudge settings. This will allow you to spawn from a different location than the Spawner. This respects the Spawner's rotation so X, Y and Z are actually Right, Up and Forward. This Vector3 gets added to the position created from the field above (X/Y/Z position mode settings). You can create any number of these.
-
Spawn Rotation Mode: This has 3 choices:
- Use Prefab Rotation: The default. The prefab will be spawned with whatever rotation the prefab has itself.
- Use Spawner Rotation: This will rotate the spawned prefabs to match the Spawner's current rotation immediately after spawn.
- Custom Rotation: This allows you to specify a custom rotation of X, Y, and Z euler degrees. Spawned prefabs will be rotated to match this immediately after spawn.
-
Spawn Scale Mode: This has 4 choices:
- Use Prefab Scale: The default. The prefab will be spawned with whatever scale the prefab has itself. Note that if it's spawned as a child of the Spawner, the Spawner's scale will affect the scale of things spawned. If you are going to change the Spawner scale around, you will probably not use this option and might prefer "Percent Of Spawner Scale", below.
- Use Spawner Scale: This will set the spawns to the scale of the Spawner itself.
- Percent Of Spawner Scale: This will set the spawns to the scale of the Spawner itself times a percentage you specify here. Even though it's a percentage, it can be greater than 100%. An additional field of "Percent Of Spawner Scale" appears underneath if you choose this option and defaults to 100%.
- Custom Scale: This allows you to specify a custom scale for your spawns.
-
Spawn Limit Controls: Checking this box will allow you to limit items spawned by various criteria. Note that these controls can make it take longer than "Time To Spawn All" to spawn the whole wave.
-
Use Min Distance: On by default. Turn it off to disable Min Distance Checking. The following options are for Min Distance:
- Min. Distance: Before spawning each item, the Spawner will make sure all items spawned so far are at least this distance from the Spawner. If not, it will delay spawning another item until they are. Note than on Timed Waves this could result in less items being spawned than your normal computed Wave size.
- Random Distance: If this is non-zero, a random number between "negative this" and "positive this" will be added to the Min. Distance prior to performing the Min Distance Check. So if you chose Min Distance of 8, and Random Distance of 3 then the possible range it will use for Min Distance would be 5-11 (8-3 = 5 and 8+3 = 11).
-
Use Spawn Cap: Off by default. Turn it on to delay spawning any items more than the max you specify.
- Spawn Cap: This is the maximum number you wanted spawned at any time. Further spawning should be delayed until an item is despawned.
-
Use Min Distance: On by default. Turn it off to disable Min Distance Checking. The following options are for Min Distance:
-
Wave Elimination Bonus Prefab: Only visible for elimination waves. Checking this box will allow you to spawn a bonus prefab after the wave has been eliminated.
- Spawn on Wave Repeats: Here you choose "Final Repeat" or "All", allowing you to spawn the bonus prefab on every repeat of the wave or just when it's over.
- Bonus Prefab: Specify the prefab to spawn.
- Spawn % chance: Specify the percent chance to spawn the bonus prefab. i.e. 30% means that 30% of the time it will spawn bonus prefab(s), and the other 70% it will not.
- Spawn Quantity: Specify the quantity of the bonus prefab to spawn if the % chance randomly succeeds.
-
Repeat Wave: Turning this on will force your Wave to repeat automatically when the full Wave of prefabs have been killed or despawned - there is another option for Timed Waves too. If Repeat Wave is on, that section looks like this:
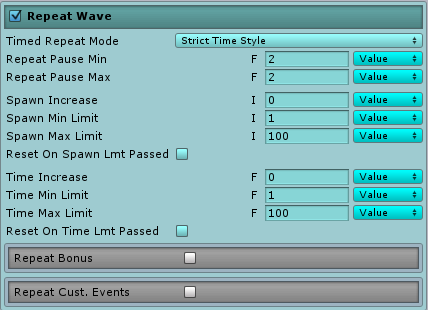
The following controls appear here:
-
Repeat Mode: Only visible for Elimination Waves. There are 4 choices:
-
Number Of Repetitions: You choose the number of repetitions with the next field.
- Repetitions: How mamy times to repeat the Wave.
- Endless: This loops the Wave forever.
-
Until World Variable Above: This will repeat the Wave until 1 or more World Variables equal or exceed values you specify below with the "Variable Limit" dropdown and controls.
- Add Variable Limit: Use this to add Limits for the above Repeat Mode. For example, add "score" and the value 1000 to make the Wave repeat until you reach 1000 score.
-
Until World Variable Below: This will repeat the Wave until 1 or more World Variables equal or are less than values you specify below with the "Variable Limit" dropdown and controls.
- Add Variable Limit: Use this to add Limits for the above Repeat Mode. For example, add "Health" and the value 100 make the Wave repeat until you drop down to 100 Health.
-
Number Of Repetitions: You choose the number of repetitions with the next field.
-
Timed Repeat Mode: Only visible for Timed Waves, there are 2 choices:
- Elimination Style: The default. The Wave will behave like a time-boxed repeated Elimination Wave. i.e. Wave will repeat for X seconds and repeat every time all items are despawned. Repeat Pause time (below) will begin after all items are despawned.
- Strict Time Style: The Wave will immediately start the Repeat Pause time after the last item has spawned.
- Repeat Pause Min / Max: A random time interval between these two numbers (in seconds) will be paused for before repeating your Wave again.
- Spawn Increase: This allows you to make the repeated Wave have more items spawned than the original. Or vice versa.
- Spawn Min Limit: This allows you to set a ceiling that the Spawn Increase plus current Wave size will never go below. Think of it as "min Wave size".
- Spawn Max Limit: This allows you to set a ceiling that the Spawn Increase plus current Wave size will never exceed. Think of it as "max Wave size".
- Reset On Spawn Limit Reached: If you check this, the "increase" fields will reset back to zero (original Wave setting) whenever the limit (min or max) is reached. This allows you to do things like have a repeating Wave that spawns 5, 6, 7, 5, 6, 7, etc (resetting back to 5 if 7 is the limit).
- Time Increase: This allows you to make the repeated Wave "Time To Spawn All" longer than the original Wave. Or vice versa.
- Time Min Limit: This allows you to set a ceiling for the "Min Wave Spawn Time" so that the Time Increase being added every repeat will never make it shorter than this value.
- Time Max Limit: This allows you to set a ceiling for the "Max Wave Spawn Time" so that the Time Increase being added every repeat will never make it longer than this value.
- Reset On Time Limit Reached: If you check this, the "increase" fields will reset back to zero (original Wave setting) whenever the time limit (min or max) is reached. This allows you to do things like have a repeating Wave that spawns for 5, 6, 7, 5, 6, 7 seconds (resetting back to 5 if 7 is the limit).
- Repeat Bonus: If you check this box, you can assign a set of World Variable modifiers that will be awarded every time the Wave is repeated. This is identical to the "Killable Killed" World Variable modifiers section on the Killable script.
- Repeat Custom Events: If you check this box, you can assign a set of Custom Events that will be fired every time the Wave is repeated.
-
Randomization: Turning this on will allow you control over randomizing the position and rotation of your spawned prefabs:
- Random Rotation X/Y/Z: You can specify you want random rotation on the X, Y, and Z axes, or any combination thereof. Any axes you do not check will use the original prefab’s rotation. For each axis you enable random rotation for, a pair of sliders will appear underneath called "Rand. X Rot. Min" and "Rand. X Rot. Max" for the X axis, etc. These will limit the minimum and maximum angle for your spawned items. By default the entire 0-360 degree range is used. You can narrow this to enable smaller ranges of random angles as seen in a popular fruit slicing mobile game.
- Random Distance X/Y/Z: You can specify that you want the prefab’s spawn location to be a within a certain distance of the Spawner instead of exactly where the Spawner is. If you set Random Distance X to 10 for instance, it will add a random number between -10 and 10 to the spawn position. The same goes for Y and Z.
-
Incremental Settings: Turning this on will allow you to have each successive item in a Wave spawn with a changing starting position or rotation. This allows you to spawn a row of enemies (a la Space Invaders), or a Wave of enemies rotated to cover 180 degrees of fire. The settings are as follows:
-
Distance X/Y/Z: You can specify that each successive spawned item has an extra X * item number to its spawn location. In other words, if you put 10 for X:
- Item 1 spawns from the Spawner location.
- Item 2 spawns from the Spawner location + 10x.
- Item 2 spawns from the Spawner location + 20x, etc.
-
Rotation X/Y/Z: You can specify that each successive spawned item gets rotated an extra X degrees from the prefab rotation. So if you put 40 for X:
- Item 1 spawns with the prefab’s rotation.
- Item 2 spawns with the prefab’s rotation + 40 degrees X (Euler).
- Item 3 spawns with the prefab’s rotation + 80 degrees X (Euler), etc.
- Keep Center: Check this if you would like the incremental rotation settings be equally split between left and right. It enables effects like Contra's infamous spread shot. The Triggered Spawner example scene has an enemy using this for it's attack.
-
Distance X/Y/Z: You can specify that each successive spawned item has an extra X * item number to its spawn location. In other words, if you put 10 for X:
-
Post-Spawn Nudge Settings: Turning this on will allow you to alter the spawned prefab’s position immediately after it has been spawned and rotation has been applied, whether that rotation came from Incremental or Random Settings. This can make it possible to spawn a ring of enemies where you set the radius of the ring here, and other cool patterns.
- Nudge Forward: This controls the distance to nudge the prefab forward after spawning.
- Nudge Right: This controls the distance to nudge the prefab to the right after spawning.
- Nudge Down: This controls the distance to nudge the prefab down after spawning.
-
Repeat Mode: Only visible for Elimination Waves. There are 4 choices: