
Pool Boss
Pool Boss is a prefab pre-loader / recycler. Configuring Pool Boss is mandatory to use all features of Core GameKit that specify a prefab or Prefab Pool, and you can now use Addressables as well after enabling it from the Welcome Window. Make sure to read some notes at the bottom of this page about Addressable usage.
If you are unfamiliar with the reasons for using a pooling solution, here are the basics. Instantiate and Destroy calls (which normally happen if you don't use pooling) can cause stuttering when complex objects are created (and destroyed) during game play, especially on mobile devices, due to Garbage Collection. A pooling solution will create everything up front when the Scene starts, in a despawned (disabled) state initially. For setup, you simply specify which items you want in that pool, and how many of each. The disabled Game Objects will become enabled when spawned (replaces Instantiate), and then become disabled again when despawned (which replaces Destroy), ready for reuse. Performance is massively improved and more predictable by a system such as this.
Items you create in Pool Boss will never "go away" until Pool Boss' Game Object is destroyed. If you need temporary pool items that can come and go when they please, take a look at Pool Mini-Boss.
Note: Despawn vs Kill. There are several options in Pool Boss that have you choose whether to despawn or kill a Game Object. Despawn means it just disappears, and would spawn a Vanish Prefab if any is configured. Kill means the Killable has been "killed", so you will not see the Vanish Prefab. However you will see any Death Prefabs and the Death World Variable Modifiers will be used.
Here's what Pool Boss looks like with a few Categories and Items.
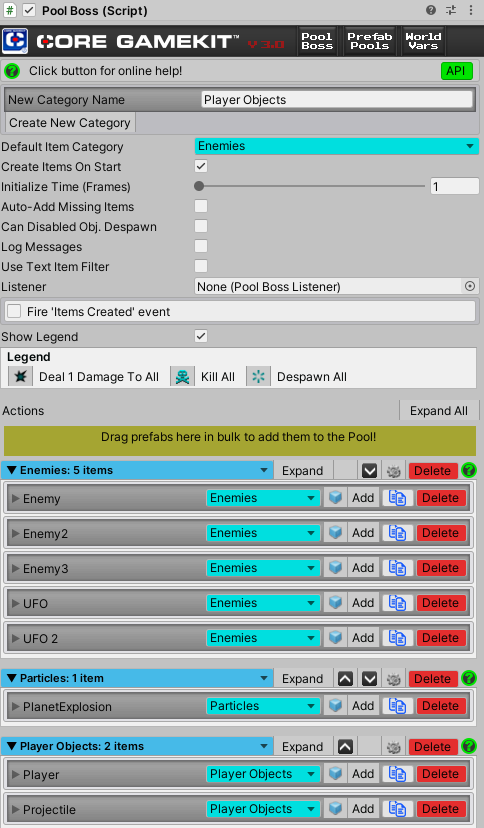
There are 2 sections of controls, plus controls that only show up at runtime, and some important notes you should keep in mind:
- Top Section: Settings that apply to the entire Pool Boss.
- Category / Item Settings: Settings for each Category / item.
- Runtime Settings: Extra controls at runtime.
- Other Important Notes: Important Gotchas about coding and using pooling correctly.
Top Section
- Create New Category Button: Type a Category name into the New Category Name field then click the button to create a new Category. Must be unique.
- Default Item Category: Any new items created will use the Category selected here.
-
Create Items On Start: Default is checked. If you uncheck it, you will need to call
PoolBoss.Initializefrom your own code when you want Pool Boss to start creating its items. - Initialize Time (Frames): Defaults to 1. This controls how long it takes Pool Boss to create all the clones of all items, and be ready for spawning. You can set this from 1-1000 frames, where X is the number of different prefabs you have configured in Pool Boss. This is useful to increase higher to keep the frame rate smoother while instantiating things for the pool.
-
Auto-Add Missing Items: Checking this box will actually allow you to "half-pool", meaning that you can check the box and hit play without adding any pool items. What will happen is that nothing will be created up front, but pool items will be created (Instantiated - bad for performance) as you need them, and can be reused after that. Also, any prefab that is in the Hierarchy (already in the Scene and doesn't need to spawn) will get despawned into the pool when it goes away so you can reuse it later in that Scene. If you do not check this box, any prefabs you try to spawn that don't have a matching pool item will instead log an error telling you why and nothing will spawn.
Note: Only use this setting for quick prototyping - do not ship a production game like this! - Can Disabled Obj. Despawn: Off by default. If you need to be able to despawn a Game Object you have disabled, you must check this box. It is worse on performance because it doesn't only check "is the object enabled" so only use it if you must have the ability.
- Log Messages: Checking this box will tell you when each prefab spawns, despawns, or if Pool Boss needs to Instantiate an extra copy because you are already using all copies of the prefab.
-
Use Text Item Filter: Turn this on to show a text field for typing an item’s partial name. Shows the following fields:
- Text Item Filter: Allows you to filter the items shown beneath to only those whose names contain the text you type here. An empty text box does not filter.
- Clear Button: Click this button to clear the Text Group Filter textbox (unfilter).
- Show Legend: On by default, this shows you what the icons in Pool Boss do, as the screen shot shows.
- Listener: Here you can drag in a PoolBossListener to hook into key events and do customized coding. For more about Listeners go here.
- Fire 'Items Created' event: You can check this box and select one or more Custom Events to fire when all items have been created. This is useful to spawn a wave from a Triggered Spawner because it will wait until the pool items are available.
- Expand / Collapse All Buttons: Click these to expand / collapse all Categories and items.
- Create Items As: This only appears if you have enabled Addressables from the Welcome Window. This controls whether the item you drag into the Yellow Drag Area is created as a prefab reference or an Addressable. If you haven't enabled Addressables, it will always be a prefab reference, so no control is necessary.
- Yellow Drag Area: Drag a prefab here to create new items.
Category / Item Settings
-
Category Title Bar Controls: The blue bars with arrows display Category names. You can define any number of Categories for your pool items, but they are optional. These are for visual organization only. They do not define probability of spawning. Use Prefab Pools for that. Categories have the following settings, all in the title bar:
-
Collapse / Expand Button: Click this to collapse / expand the Category.
- Shift Up / Down Icon: Use these icons to re-order your Categories, for your preference only.
- Gear Icon: Will allow you to change the name of the Category. When editing the name, click the red X icon to cancel edit or the disc icon to save the new name.
- Delete Button: Deletes the Category - only if it's empty. You can move items into a different Category first if you want to delete it, or delete the items.
-
Collapse / Expand Button: Click this to collapse / expand the Category.
-
Per-Item Settings: The following controls are shown for each item in a Category:
-
Title Bar Controls: The gray bar with arrows display item names. Title bar has the following controls:
- Category: This is the blue dropdown. Select a different Category from the dropdown to change Category.
- Prefab Icon: Clicking the Prefab icon will highlight the prefab in Project View.
- Add Button: Adds a blank item at the end.
-
Clone Icon: Creates a copy of the item just after this item.
After cloning, you will need to change the prefab because it must be unique for each item. - Delete Button: Deletes the item.
- Prefab Source: Only appears if you have enabled Addressables. Choose either Prefab (the default) or Addressable.
- Prefab: Visible if you have selected "Prefab" in the Prefab Source field, or if you don't have the Prefab Source field (Addressables not enabled). Drag a prefab here to change which prefab you want to pool.
- Prefab Addressable: Visible if you have selected "Addressable" in the Prefab Source field. Drag a prefab or Addressable here to use it for the pool item. It will become an Addressable if it isn't already.
- Preload Qty: Here you specify the amount of copies of the prefab to create when the Scene starts. They will all begin despawned (inactive in the Hierarchy) and will appear as a child of the PoolBoss prefab that is under LevelWaveSettings.
-
Allow Instantiate More: This defaults to off. If you check this box, and there are no remaining copies of the prefab despawned, another copy will Instantiate (not good for performance). Leave this checkbox on if you aren't sure how many you need. Later you can adjust the Preload Qty and turn this off. If checked, more settings appear.
- Item Limit: This is used to put a limit on the amount of items that can be Instantiated after the Scene begins. This number will default to your Preload Qty.
- Recycle Oldest: Defaults to off. Only visible when Allow Instantiate More is off, this allow you to reuse the oldest spawned item when there are none available to spawn. Sometimes this may not be a useful option because the "old" item despawning will just disappear and it may be onscreen. It might look weird.
- Enable NavMeshAgent: Defaults to off. Only visible if you have a NavMeshAgent Component on your pool item. If you do not disable your NavMeshAgent, then you will get errors in the Console as each one awakens prior to spawn (since they will be disabled). This checkbox will auto-enable the Component as it spawns.
- NavMeshAgent Frames Delay: Defaults to 1. Only visible if you have Enable NavMeshAgent on. This controls the number of frames after spawn to enable the NavMeshAgent. Due to a bug in Unity, you may want to set this to 1 or slightly higher frames to get around a bug they've had for many years. You can set it to zero but you'll probably experience weird bugs.
- Log Messages: Checking this box lets you log messages for only the pool Items you check instead of all pool items (the global same-named checkbox in the Top Section). Good for troubleshooting.
-
Title Bar Controls: The gray bar with arrows display item names. Title bar has the following controls:
Runtime Settings
At runtime, there are other indicators and controls for each Category, Item and Globally. This shows most of them:
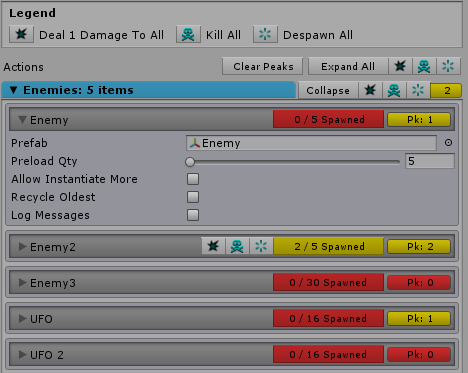
The following extra controls are available:
-
Top Section Action Buttons: Read the legend above to know what each icon is for.
- Clear Peaks: Click this to reset the peaks to the current number spawned for all pool items. Read what peak does below.
- Deal 1 Damage To All: This will deal 1 damage to all active Game objects that have a Killable Component.
- Kill All: This will kill all active Game Objects that are using a Killable Component. Those that are not using a Killable Component will be unaffected.
- Despawn All: This will despawn all active Game Objects that are set up in Pool Boss.
-
Category-Level Buttons:
- Deal 1 Damage To All: This will deal 1 damage to all active Game objects in this Category that have a Killable Component.
- Kill All: This will kill all active Game Objects in this Category that are using a Killable Component. Those that are not using a Killable Component will be unaffected.
- Despawn All: This will despawn all active Game Objects in this Category.
- Spawned Count: Click the yellow / red rectangular indicator all the way right to select all spawned pool items in this Category. The number there is the number of spawned items. Color coded: red means no items spawned and yellow has items spawned. This is good when you collapse all and want to see what Categories have things spawned.
-
Item-Level Buttons:
- Deal 1 Damage To All: Only here if this item has a Killable Component. This will deal 1 damage to all active Game objects of this item that have a Killable Component.
- Kill All: Only here if this item has a Killable Component. This will kill all active Game Objects of this item that are using a Killable Component.
- Despawn All: This will despawn all active Game Objects of this item. This and the previous 2 buttons only show if there is at least one item spawned.
-
Spawned Count: The yellow text "2/5 spawned" in the screen shot above. That lets you know how many are spawned and what the total number of all copies of the pool item is (spawned + despawned). This is also great when you have turned on Auto-Add Missing Items. You can play the busiest section of your game, and just before pressing stop, pause the game and click on PoolBoss to take note of the totals so you can create or modify your Pool Items with those numbers in mind. Good time saver! You can click on this text to select all the spawned items in the Hierarchy. Color coded: red means no items spawned and yellow has items spawned.
Note: If you have any pre-spawned Game Objects and want them to show in the "Spawned Count" (and get better performance), make sure and add the Poolable Info script to them. - Peak Indicator: Shows as "Pk: X". Color coded: red means no items spawned and yellow has items spawned. This will always show the highest number of the pool item that have been used since you hit play. Click the peak indicator to reset the peaks to the current number spawned for this pool item.
Other Important Notes
-
Never Instantiate Or Destroy:
There is one important thing to remember when using pooling.
Never call Instantiate or Destroy! If you destroy a cloned prefab in the pool by code, it will no longer be available the next time Pool Boss needs it. Pool Boss will log an error if this happens so you can find your code that did it (or it could be another plugin's code). Also, for the same reason, make sure you're not using "auto-destruct" checkboxes on anything, including Trail Renderers and Particle Animators. -
If you are using Addressables, these are some important points:
It's a good idea to load any externally hosted Asset Bundle(s) containing your Addressables before Pool Boss needs them so you don't encounter potentially lengthy latency as the Bundles are downloaded prior to pooling. This will delay you being able to spawn anything.
There is no way to automatically release memory for Addressables in Pool Boss when the Pool Boss game object is destroyed. You have two options to make it work. 1. Use the API to call PoolBoss.DestroyAllItemsAndReleaseMemorybefore Pool Boss game object is destroyed by a Scene change. 2. Use Pool Mini-Boss to manage your Addressable items. Pool Mini-Boss does automatically handle the releasing of memory for Addressables if it's destroyed. -
Code Usage: There are events broadcast whenever a prefab is spawned or despawned. Any script on any prefab (or sub-prefab) can perform actions in these event handlers. These are them:
- OnSpawned: This code fires immediately after the prefab has spawned. Note that when not using pooling solutions, you put a lot of initialization code in the Awake or Start event. However, you will want to move some or all of that code into the OnSpawned event so that it fires each time the prefab is respawned. This is because the Awake and Start events will not fire again when the prefab is respawned. Take a look in the KW_Enemy.cs script in the Example Scenes for a useful pattern. I made a method called AwakeOrSpawned and call it from both events (Awake and OnSpawned). That way it will work even if the prefab doesn't spawn the first time (already in the Scene).
- OnDespawned: This code fires immediately before the prefab despawns. This should be cleanup code only, and it should not take longer than one frame to execute (starting a CoRoutine is not advised). When despawn occurs, the prefab will be re-parented as a child of the PoolBoss prefab under LevelWaveSettings automatically.
- Particles / Audio: If you want to spawn Particles or audio items, make sure to attach the Timed Despawner script to those prefabs and set the Life Seconds to the amount of time the audio should play or the amount of time the particle takes to disappear. Then these prefabs will return to the Pool. However, if you need a way to pool audio, we do recommend that you check out our flagship product Master Audio. Actually it does not pool, but it gives you the same benefits.
-
Samples of the API: Here's a few common calls.
-
PoolBoss.SpawnInPoolis the main method to spawn something. -
PoolBoss.Despawnis the main method to despawn something. -
You can also chain a
.WithScaleor.WithLayermethod call to the end of the Spawn method call. See the API website for more details.
-