


Advanced Settings
This section appears in the Master Audio game object. The Advanced Settings section contains many settings to fine-tune your use of Master Audio. There are some controls in the top section, and a handful of collapsible sections as well.
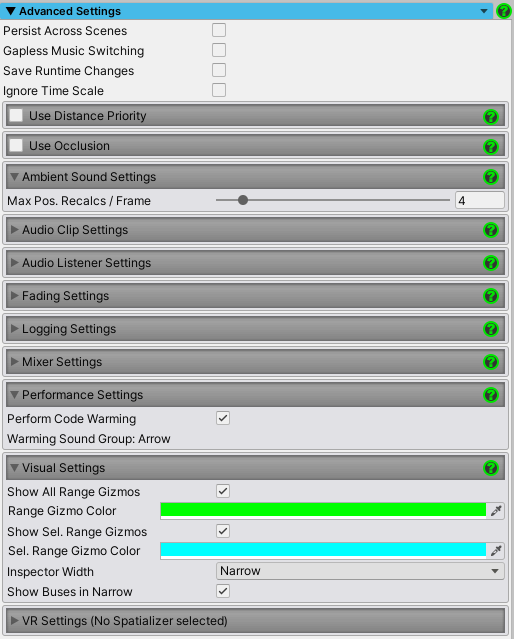
Top Section
-
Persist Across Scenes: Checking this will make it so the Master Audio game object (and all Playlist Controller game objects if you have them) will not be destroyed when loading new Scenes. If you are going to use this option, we recommend using a "bootstrapper" scene that only ever occurs once at the beginning of game play. The included example Scenes "BootstrapperDemoScene" and "GameScene" show this working with per-Scene sounds. Play the Bootstrapper Scene in the editor for instructions on setup. There is code in the Awake event of both Master Audio and Playlist Controller game objects to delete "extras" of those prefabs in case you choose not to use a bootstrapper scene and go back to the Scene with the persisted Master Audio.
Note: Make sure your Playlist Controllers don't have a parent game object in the Scene or they will not persist since we cannot assume that the parent should persist.Note: If you use this option, you will likely want to use Dynamic Sound Group Creators to create temporary Sound Groups & Buses for each Scene. That way, only the Sound Groups that are used in all Scenes would be set up in the Master Audio game object and memory usage is not wasted, and you will have less Sound Groups overall for your sanity. And/or you should also investigate the different memory-saving Audio Origins.
-
Gapless Music Switching: Defaults to off because it generally will not be needed for users who use crossfading, which is the majority. If you turn on Gapless and you are using music Resource Files, Addressables or have Preload Audio Data unchecked, audio memory usage will increase as most of the time there will be 2 Resource Files in memory simultaneously. Gapless also makes a slight hit on performance, so only turn it on if you really need it. Resource files and Addressables seem to be the most consistent with this option (no gaps or overlaps and sometimes other options don't always work correctly 100% of the time).
Known issue: If you change (jump via code) the position of the current song at all or change the pitch of the song while it's playing, the next song may arrive slightly early or late (1 frame is common). There is no way to fix this due to the Unity API and a math precision deficiency. Hopefully Unity will address this in a future update. However, do read about the Auto-Reschedule option below, which fixes it in many cases.Known issue: If you change (jump via code) the position of the current song into the crossfading portion at the end, the next may arrive after the crossfade is complete. This should be ok since crossfading and Gapless are not meant to be used at the same time, in fact turning on Gapless with a non-zero crossfade will show a warning in the Inspector telling you so.
- Auto-Reschedule: Only visible when you have Gapless Music Switching checked. It will fix gapless to work even if you skip around in the track. It only works perfectly with pitch of 1 and sample rate of 48,000 or above. You can override your sample rate to 48,000 for it to work, and that even works on compressed files.
-
Save Runtime Changes: Defaults to off. If this is checked when you stop playing and return to edit mode, any changes you made to the Master Audio game object, Group Mixer, Sound Groups, Variations and Playlist Controllers will be persisted when you return to edit mode.
Note: Use this mode sparingly, because even volumes that are mid-fade when you press stop may be preserved at the mid-fade level. Basically it will save any changes to the game objects whether you made them manually or not (script side effect). This is unavoidable.
- Ignore Time Scale: This is off by default. If you require the ability for things to work properly at zero time scale, turn this on. Note that the only functionality that currently requires this option is the DelayBetweenSounds script. Everything else should work fine without this option turned on.
Collapsible Sections
-
Use Distance Priority: Defaults to off. If you check this, Master Audio will automatically calculate a priority to assign to each 3D Audio Source you play based on its distance from the Audio Listener in the Scene. Further away objects will get a lower priority. All sounds played in a 2D manner will get a high priority, and all music in Playlist Controllers will get a high priority. The reason for this setting is that when there are more than 32 (this max can be changed on the Unity Audio Manager dialog) Audio Sources playing, Unity likes to mute Audio Sources that aren't in the highest 32 priorities. This setting gives you some control over which sounds will be muted - but take note that using Ambient Sound script whenever possible will usually make it so that you never reach the max at all and won't need this option. If turned on, the following settings will appear.
- Reprioritize Time Gap: This defaults to 0.2 seconds and can range from 0.1 to 1.0 seconds. This value controls how often Master Audio will re-evaluate the distance of playing Variations and assign a new priority. This is only used for Variations that are following an object. Increasing this value will result in better performance, so play with it.
- Use Clip Age Priority: If you turn this on, even non-following sounds will have their priority recalculated every X seconds (using the setting above: Reprioritize Time Gap), taking into account the amount of time since the sound was started. Newer clips will get a higher priority. Old clips will be more likely to be muted. Turning this on will cost extra performance, so use with care on mobile and make sure you aren't using a faster Time Gap than you need! This is the global setting, and will turn this on for all Sound Groups. There's also a per-Sound Group setting found in the Sound Group's Inspector, with the same name.
- Use Occlusion: Defaults to off. Occlusion is an optional feature that will periodically use Raycasts to check if something is blocking the Audio Source in a straight line to the Audio Listener and make it sound different. Read more about occlusion controls here.
-
Ambient Sound Settings: This holds the following options, which are used by the Ambient Sound script.
- Max Pos. Recalcs / Frame: Defaults to 4. This controls the maximum number of position recalculations per frame used by the "Use Closest Collider Position" option on Ambient Sounds.
- Active Ambient Sound Scripts: This label appears at runtime and tells you how many Ambient Sound Scripts are active in the Scene and being tracked.
-
Audio Clip Settings: This holds the following options:
- Keep Paused Resources: Defaults to off. If you check this, you will be able to resume paused sound clips that are loaded from Resource folders (aslo Audio Clips with Preload Audio Data off, and Addressables as well - see Audio Origin page). However, be advised that until you manually call Stop on Resource sounds that you pause, audio memory will not be released. This is not advised.
-
Audio Listener Settings: This holds the following options, which are used by Ambient Sound script.
- Variation Update Method: Defaults to Late Update. You can change this to Fixed Update if you have a reason for that, such as using a gravity Rigid Body on the Listener.
- Follower Has Rigidbody: Defaults to on. If you do not use Ambient Sound script, you may turn this off. When on, there will be a single non-gravity Rigidbody that follows the Audio Listener position. It is used by Ambient Sound script to play sounds only when within audible range.
-
Fading Settings: This holds the following options.
-
Bus Stop Voice Fade Time: Controls the fade time when stopping Variations from Voices Exceeded Behavior on the Bus. Default is 0.3 seconds. Settable from 0 - 1 seconds.
- Buses: If you check this, when a Bus is faded to zero volume, all audio on the Bus will be stopped.
- Sound Groups: If you check this, when a Sound Group is faded to zero volume, it will be stopped.
- Playlist Controllers: If you check this, when a Playlist is faded to zero volume, it will be stopped.
-
Bus Stop Voice Fade Time: Controls the fade time when stopping Variations from Voices Exceeded Behavior on the Bus. Default is 0.3 seconds. Settable from 0 - 1 seconds.
-
Logging Settings: This holds the following options:
- Disable Logging: Turn this on when you do a release and you're satisfied that you don't need to read logs any more. It will override Log Sounds and any per-Group log settings.
- Log Sounds: This will output information to Console about which random child has been played, whether there were none available to play, and a lot more. Turn this on for debugging only. Messages are "info" level, so they're white.
- Log No Voices Left: This one is on by default. It will log to the Console when there are no voices left to play a sound effect, so you can know if you need to increase the weight or other voice limiting setting.
- Log Custom Events: If checked, this will log to the Console whenever a Custom Event is fired. This can help you figure out what script is firing the Custom Event if you don't know.
- Log Parameter Commands: If checked, this will log to the Console whenever a Parameter Command is invoked. This can help you figure out what script is invoking the Parameter Command if you don't know.
-
Mixer Settings: This holds the following options:
- Mixer Update Mode: This defaults to Unscaled Time, and affects Transition To Snapshot functionality by Master Audio by Event Sounds. If you want Time Scale to affect it, choose "Normal" instead.
-
Performance Settings: This holds the following options:
- Perform Code Warming: Defaults to on. The code warming occurs during the first frame and calls several often-used Master Audio methods to warm the code. If you turn it off, the first time you play a Sound Group, it will take much longer than with warming on. Here you will see a display of the Sound Group it will use to performa a silent "warm call".
-
Visual Settings: This holds the following options.
- Show All Range Gizmos: Defaults to on. This will display a mesh sphere gizmo for each Ambient Sound and Event Sounds script with a Sound Group selected so you can see the max distance of the audio in Scene View. Turn this off to hide the Gizmos.
- Range Gizmo Color: Select a color that the mesh sphere gizmos will be drawn in.
- Show Selected Range Gizmos: Defaults to on. This will display a mesh sphere gizmo for the Game Object selected in the Hierarchy, if it has an Ambient Sound or Event Sounds script with a Sound Group selected. Turn this off to hide the Gizmos.
- Selected Range Gizmo Color: Select a color that the mesh sphere gizmos will be drawn in for the selected Game Object.
- Inspector Width: Defaults to Narrow. Normal is about 50% wider than Narrow. Wide makes the Group and Bus sliders 3 times as wide. Good for fine adjustments, but takes up a lot of screen real estate. You will probably not use Wide unless you have a dual monitor setup.
- Show Buses in Narrow: Defaults to on. You can hide the Buses in narrow mode by checking this.
-
VR Settings: We support the Oculus Spatializer, Steam Audio, and Resonance Audio. The header will display which Spatializer plugin you have selected as part of the title.
Note: Make sure to install the package included with Master Audio for the Spatializer you have installed. Located in the
Plugins/DarkTonic/MasterAudio/3rd Party Plugin Integrationfolder. The choices are "MA_SteamAudio", "MA_ResonanceAudio", "MA_Oculus" (deprecated) and "MA_OculusMetaXR".The following options appear here:- Use Spatializer: This is off by default. Turn it on for VR use (Oculus Spatializer checkbox on all Sound Group Audio Source's will be checked at runtime).
- Oculus Spatializer Controls:
- Add Oculus Audio Source: Check this box to add an ONSP Audio Source to all Variations. Unchecking it will remove them.
- Resonance Audio Controls: Only visible if you have selected Resonance Audio as your spatializer.
- Spatialize Post FX: This is off by default. Turning this on will check the "Spatialize Post Effects" checkbox on every Audio Source in all Sound Groups at runtime.
- Add Res. Audio Sources: Check this box to add the Resonance Audio Source component to all Variations. Unchecking it will remove them. Read more here.
- Steam Audio Controls: Only visible if you have selected Steam Audio as your spatializer.
- Spatialize Post FX: This is off by default. Turning this on will check the "Spatialize Post Effects" checkbox on every Audio Source in all Sound Groups at runtime.
- Add Steam Audio Sources: Check this box to add the Steam Audio Source component to all Variations. Unchecking it will remove them.