

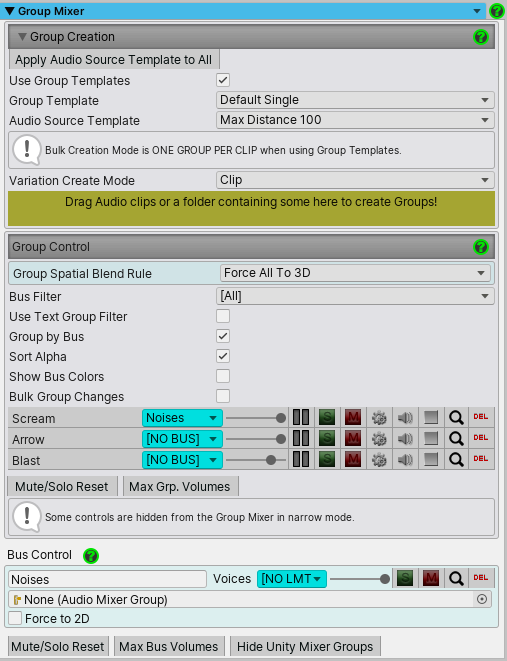
Group Mixer
This section appears in the Master Audio game object. The Group Mixer section shows all your Sound Groups, with volume control, Buses, mute and solo buttons, voice count (at runtime) and a lot more. This is also where you create new Sound Groups. There are no Buses at first. You can create them as you need them. The image below shows 3 Sound Groups already set up and 1 Bus. You can have a Sound Group do fades, mutes, and a lot more from the Event Sounds script with no coding! You can also create "dynamic" Sound Groups with the Dynamic Sound Group Creator prefab.
There are 4 main sections to the Group Mixer, listed below. Click on the links below to read more about each.
Group Creation
The Group Creation section can be collapsed if you want more screen real estate. It looks like the image below.
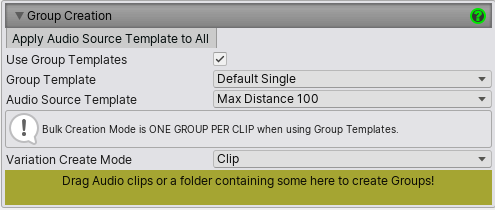
The following controls are available in this section:
-
Use Group Template: If you check this, a dropdown of Group Templates will appear underneath. Now whenever you drag in an Audio Clip (into the yellow rectangular area), it will create a Sound Group and Variations based on the template selected in the dropdown. Bulk Creation Mode (described next) is disabled when using Group Templates because Group Templates take a single audio file and create 1 or more Variations of it based on the template. There are 19 templates, including:
- 25% Chance To Play
- Random Pitch Subtle
- Volume Falling
- Pitch Rising Chromatic
Note: You can create more templates and drop them in the folder:MasterAudio/Sources/Prefabs/GroupTemplates. If you make any cool templates, please do share them with Dark Tonic and we may include them in future updates! Below are the steps to create a new template:- Set up the Group as normal in the Master Audio game object in the Scene.
- Note that you can name a Variation "Silence" to specify that this Variation should not have an Audio Clip when using the template.
- Duplicate the Group (CTRL + D on Windows).
- Drag the duplicate outside of the Master Audio game object and use this for the next step.
- In this duplicated Group, remove all Audio Clips and all Filter FX in all Variations. Be extra careful that you don't leave or put any Audio Clips or Filter FX into the templates themselves as they will take up audio memory even if you haven't created any Groups with the templates! We check that both of these aren't in the template up front, but if you add them to the template prefab later, we cannot catch that.
-
Now drag the Sound Group game object into the
MasterAudio/Sources/Prefabs/GroupTemplatesfolder.
-
Audio Source Template: Audio Source Templates are used to set up 3D settings and other Audio Source properties in bulk for many Sound Groups. All Variations in all Groups you create in the future will use the Audio Source Template you select here. There is a library of 7 in the folder:
MasterAudio/Sources/Prefabs/AudioSourceTemplates. If you need more, you can add them in that folder or ask us to create them. Note that editing an Audio Source Template does not affect any Sound Groups that it has been previously applied to, until you apply it again.- Apply Audio Source Template to All: This button appears in the top row of the Mixer section. This will apply the selected template to all Sound Groups. There's also an option in Bulk Group Changes to apply the template to a whichever Sound Groups you select.
- Note: Groups created at runtime by a Dynamic Sound Group Creator will not use this setting. The Audio Sources will be copied from the Dynamic SGC as is when creating the temporary Groups.
-
Bulk Creation Mode: This is used for quick Sound Group and Variation creation. You can click the lock icon at the very top right of the Inspector to enable selection of multiple clips from Project View without losing focus on the Inspector to use Bulk Creation Mode. There are two mode choices in the dropdown:
- One Group Per Clip: (The default choice) Each clip will create a new Sound Group with 1 Variation, which is the clip.
- One Group With Variations: This will create a single Sound Group and each clip will become a Variation of the clip.
- Variation Create Mode: This is the 2nd dropdown and lets you choose between the different Audio Origins, which affect memory usage and latency. Read about the options on that page.
- Yellow Drag Area: Drag Audio Clips (or folders of Audio Clips) here to create Sound Groups. You can click the lock icon at the very top right of the Inspector to enable selection of multiple clips from Project View without losing focus on the Inspector so you can drag in several at once if you have an older version of Unity that doesn't support folder dragging.
Group Control
The Group Control section contains a Group & Bus Mixer, as well as some filtering and bulk editing controls and other features.
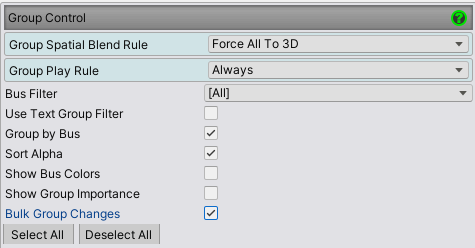
The following controls are available in this section:
-
Group Spatial Blend Rule: Since Unity 5, Audio Clips no longer have a setting to tell Unity they are meant to be 2D or 3D sounds. A similar setting for that is on each Audio Source instead, called Spatial Blend. Master Audio handles this for you with Spatial Blend Rule controls. If you wish to globally set all sound effects to 2D, 3D or Custom (value between 0 and 1 where 0 is 2D and 1 is 3D), pick one of the first 3 options. Option 3 will allow you to pick the Spatial Blend (0-1). The last option will instead allow you to set a similar control on each Sound Group's settings (click the gear for that Group on the mixer to find it). Otherwise that control is not present on the Groups. Choices for Group Spatial Blend Rule are:
- Force All To 2D: All Audio Sources in all Sound Groups will be 2D.
- Force All To 3D: (The default) All Audio Sources in all Sound Groups will be fully 3D.
-
Force All To Custom: All Audio Sources in all Sound Groups will be set with the value you provide in the field that appears next called Group Spatial Blend.
- Group Spatial Blend: Only appears when using Force All To Custom and will be used to set all Audio Sources in all Sound Groups with the value you provide here.
-
Allow Different Per Group: Audio Sources in each Sound Group will be set according to what is set in the Sound Group's Spatial Blend Rule.
- Default Blend Type: Only appears when using Allow Different Per Group and sets the default Group Spatial Rule of new Sound Groups you create.
-
Group Play Rule: Only visible if your Group Special Blend Rule is not "Force All to 2D", because it requires 3D Audio Sources to pull the Max Distance value from. This controls whether sounds are played based on what you select here.
- Always: The default. Always plays the sound.
- When Actor In Audible Range: the Sound Group will only play if the Actor is within audible range, based on the Max Distance of the Audio Source and the distance to the Audio Listener.
- Allow Different Per Group: This allows you to set the Group Play Rule on each Sound Group instead of globally.
- Default Group Play Rule: Only visible if you have chosen "Allow Different Per Group" in Group Play Rule. This controls the default Group Play Rule for when you create any new Groups. Existing Groups are not changed.
- Bus Filter: You can choose which Sound Groups appear in the mixer by selecting the Bus they belong to. All Buses is the first choice and the default. This is very useful when you have a lot of Sound Groups. Only visible if you have 1 or more Buses.
- Use Text Group Filter: This allows you to type a few characters and filter out all non-matching Sound Groups by name, wildcard style (not case sensitive). For instance if you type "ar" you would match Sound Groups with names: arrow, car, and parsnip.
- Filter Out Inactive: Defaults to off. This only shows up at runtime. Turning this on will hide all Sound Groups with zero voices playing.
- Group By Bus: Defaults to on. This will organize Sound Groups in the mixer according to their Bus. Only visible if you have 1 or more Buses.
- Sort Alpha: Defaults to on. If you uncheck it, things will appear in the same order as Hierarchy, otherwise sorted (works within bus filter as well).
- Show Bus Colors: Defaults to off. If you turn it on, you can select a color for each bus. Each Sound Group will have a small square of that color at the left of the mixer row.
- Show Group Importance: This will show a Importance dropdown for each Sound Group on the far left side of the Sound Group. This is only used when the Bus for the Group has a Voice Limit and the Voices Exceeded Behavior is set to "Stop Least Important Voice". If your Bus is at max voices and you try to play a new sound, Master Audio will try and locate a sound that's not Uninterruptible and of lesser or equal Importance to stop. If it can't find one, the new sound won't play.
-
Bulk Group Changes: turning this on allows you to select one or more Groups in the mixer (checkboxes appear on the left of each row), then make changes to all selected Groups at once by adjusting any of the selected Groups. Changes that work in bulk are: mute, solo, volume adjustment and Bus assignment. Several buttons also appear when using Bulk Group Changes mode.
- Select All: Selects all Groups.
- Deselect All: Deselects all Groups.
- Apply Audio Source Template: This applies the selected Audio Source Template (in Group Creation section above) only to selected Groups. Only visible if 1 or more Sound Groups are selected.
Group Mixer
The Group Mixer is a "pro audio" - styled horizontal channel strip. Each row represents a single Sound Group. When editing (not playing) the mixer may look like this:

When Playing it may look like the image below. Notice that the delete button is gone and there is a yellow voice count indicator as well as a loading indicator.

These images were taken in Narrow mode (change this in Advanced Settings). If you go to Normal mode, the sliders will show the numeric representation of volume as well. Narrow mode is the default, to be no wider than a normal Inspector pane. The controls in each row are described below.
-
Active Voice Count: Only visible in Play mode, the bracketed number at the left of each Group row is the number of active voices playing. This is good to help visualize how close you are coming to any limits you may have set up, or to the Unity max (32) - though this max can be changed on the Unity Audio Manager page. You can click the voice count to select all the Variations in the Hierarchy that that make up that count.
The background is color-coded as follows:
- Dark gray: Zero voices are playing.
- Yellow: Some voices are playing but some are still available to play.
- Red: All Variations in the Sound Group are busy.
- Sound Group Name: This tells you which Sound Group you are tweaking.
-
Output Bus: The blue dropdown is for assigning Sound Groups to Buses. This allows you to control the volume of several Sound Groups at once, among other things like voice limiting, muting and soloing. In essence, it's a sound router. Buses can also be routed directly to Unity Mixer Groups.
Note: By default there are no Buses. The text "[NO BUS]" (the default) means the Sound Group does not go to a Bus.To create a Bus:, select "[NEW BUS]" from the dropdown. A new Bus Control section will show up under the Group Control section if there were no Buses already. It's still part of the Group mixer section of Master Audio. You can type into the text field that says "[BUS NAME]" to change the name of the Bus.
- Volume Slider: The slider controls the master volume of the Sound Group, which affects the volume of all Variations in it.
- LED Strip: There's a colored LED strip that lights up for awhile and animates each time a Variation on that Sound Group starts playing. This is just for your information to see what's playing without having to go into Debug log mode. It does not give any indication of real volume. It lights up whether sound is triggered by the preview buttons or any other method.
- Solo: "S" is a solo switch. If any Sound Groups are soloed, only the soloed groups will be heard. It looks dark when off and lit up when on. Note that soloing one or more Sound Groups has no effect on music played through Playlist Controllers, which have their own independent solo and mute switches.
-
Mute: "M" is a mute switch. This will mute the Sound Group. It will produce no audio while muted. It looks dark when off and lit up when on.
Note: For those of you who have not used a mixing board before, here’s an explanation of solo and mute switches.
- If you have zero soloed groups, all groups will produce sound except the ones that are muted.
- If at least one group is soloed, you will only hear the soloed groups – all non-soloed groups will not be heard.
- Selecting solo will deselect mute, and vice versa.
- Settings: The gears icon will select the Sound Group in the Hierarchy so you can tweak Variations and additional controls.
- Preview: Clicking the speaker icon will preview the Sound Group. Fading and random settings besides volume and pitch are ignored while in edit mode.
- Stop: Clicking the speaker icon will stop all Variations on the Sound Group, including any previews.
- Find icon: Clicking the magnifying glass icon will launch the RelationsInspector window, filtering by this Sound Group. This will show all usages of this Sound Group by EventSounds, Ambient Sound, and MechanimStateSounds scripts by objects in the Scene. Read more about RelationsInspector here.
- Delete: Click to delete the Sound Group and all Variations in it.
Under the Group Mixer are a few buttons:
- Mute/Solo Reset: Clicking this will unsolo and unmute all Groups.
- Max Group Volumes: Clicking this will reset all volumes to max.
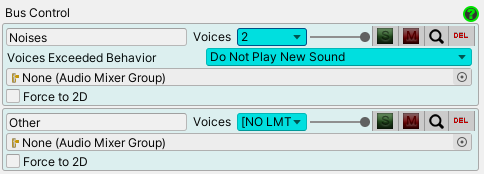
Bus Mixer
The Bus Mixer is only visible once you create a Bus from the Group Mixer. This section lets you limit voices, mute, solo and control volume of several Sound Groups at once, through the Bus selected on those Sound Groups. Each row represents a single Bus. You can have a Bus do fades, mutes, and a lot more from the Event Sounds script with no coding!
These images were taken in Narrow mode (change this in Advanced Settings). If you go to Normal mode, the sliders will show the numeric representation of volume as well. Narrow mode is the default, to be no wider than a normal Inspector pane. The controls in each row are described below.
- Active Voice Count: Only visible in Play mode, the green bracketed number at the left of each Bus row is the number of active voices playing. This is good to help visualize how close you are coming to the Bus voice limits (if any), or to the Unity max (32). The number will be red if the Bus voice limit is reached. You can click the voice count to select all the Variations in the Hierarchy that make up that count.
- Bus Name: Buses are created with a default name of "[BUS NAME]". You can type into that text field to change the name of the Bus.
- Bus Voice Limit (Voices): This defaults to unlimited "[NO LMT]", but you can pick between 1-32 voices to limit the Bus to. For example, if you have 10 character Sound Groups assigned to a "dialogue" Bus, you could limit the Bus voices to 5 so that in total only 5 Variations among those 10 Groups could be played at the same time. This helps you avoid hardware-based voice limits for mobile devices, etc. Some devices can only play 20-some odd voices for example.
-
Voices Exceeded Behavior: Only visible if Voices is set to a number. This has several choices and controls what happens when a new voice is requested to play when the Bus Voice Limit is already reached.
Do Not Play New Sound: The default. The new voice will not be played.Stop Oldest Sound: The oldest voice will be stopped in order to play the new one.Stop Farthest Sound: The voice that is the farthest away from the Audio Listener will be stopped in order to play the new one.Stop Least Important Sound: Each Sound Group will have an Importance and Uninterruptible control. The Importance control you can see on the mixer if you turn it on with the "Show Group Importance" checkbox and you can also see both on the Sound Group's Inspector. Importance and Uninterruptible works the same here as on Variations. If your bus is at max voices and you try to play a new sound, Master Audio will try and locate a sound that's not Uninterruptible and of lesser or equal Importance to stop. If it can't find one, the new sound won't play.
-
Other Controls: Each Bus has a volume, solo and mute switches, a find icon and a delete button. These work as expected, except that the solo and mute switches actually solo or mute all Sound Groups assigned to the Bus (to make things less confusing). At runtime, you will additionally see a stop button, which will stop all audio going through the Bus, and a pause/unpause button, to pause any sounds playing through the Bus while paused. The find icon launches the RelationsInspector window, filtering by this bus.
Note: If you mute or solo a Bus, all Groups with that Bus cannot have their mute and solo buttons pressed. This preserves the "Bus mute" and "Bus solo" status.
- Unity Mixer Group: Each Master Audio Bus will have an Audio Mixer Group field under it. You may assign each Bus to a corresponding Mixer Group so you can take advantage of Unity 5 Mixer features. This will route all Sound Groups that use the Bus to the Unity Mixer Group.
- Force to 2D: Checking this option is an easy way to make several of your Sound Groups all be 2D sounds. This would be useful for UI sounds, which need to always be heard in 2D. Using this setting, you can set all Sound Groups to 3D, then send all sounds intended for 2D to a 2D bus.
- Bypass Reverb Zones: Checking this will bypass Reverb Zones in the vacinity of the all actors playing Sound Groups on the Bus. The default is to not bypass them.
Under the Bus Mixer are a few buttons:
- Mute/Solo Reset: Clicking this will unsolo and unmute all Buses.
- Max Group Volumes: Clicking this will reset all Bus volumes to max.
- Hide / Show Unity Mixer Groups: This can hide the Unity Mixer Groups after you've set them up so they don't take up room on the screen.
Note: All mixer and Bus controls work in real time during Editor play!