

Playlist Controllers
Most of these settings are already covered on the Playlist Controller Setup section of the Master Audio game object, but we'll list everything here as well for completeness. Each Playlist Controller game object also contains 2 Audio Source components for crossfading purposes.
Top Section
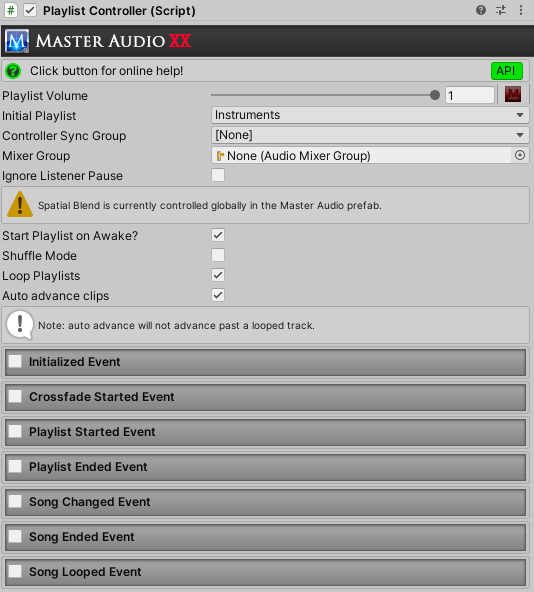
The following controls appear on the Playlist Controller's Inspector:
- Playlist Volume (slider): Think of this as the volume of the Playlist Controller itself. This is a way to balance volumes between multiple Playlist Controllers' Playlists. There's also a mute button to the right of the slider.
- Initial Playlist: Here you select a Playlist to start with. If "Start Playlist on Awake" is checked, the music will start playing a song from the Playlist when the Scene starts.
- Jukebox: At runtime only, the familiar Jukebox will appear here. The Jukeboxes for all Playlist Controllers also appear at the top of the Master Audio game object's Inspector as well at runtime.
- Controller Sync Group: Off by default (labeled [None]). It's optional and is a number 1-4. If you assign a number, then whenever a new song is played, its time (position in song) will be set to the time of the song playing in the first matching Playlist Controller (with the same Sync Group and a clip playing). This will also help align layered Resource File clips more precisely. This setting is only used with Playlists that have a Playlist Transition Mode of "Synchronize Clips".
- Unity Mixer Group: Each Playlist Controller will have an Audio Mixer Group field under it. You may assign each Playlist Controller to a corresponding Mixer Group so you can take advantage of Unity 5 Mixer features. This will route all Audio Sources on the Playlist Controller to the Unity Mixer Group. If you have layered music with more than one Playlist Controller, you may wish to create additional Mixer Groups for each Controller.
- Ignore Listener Pause: Checking this will allow the music to still play even if the Audio Listener is paused. Event Sounds has a no-code way to pause and unpause the Listener.
- Bypass Reverb Zones: Checking this will bypass Reverb Zones in the vacinity of the Playlist Controller. The default is to bypass them.
-
Spatial Blend Rule: Only visible when Music Spatial Blend Rule in the Playlist Settings is set to Allow Different Per Controller. There are several choices here:
- Force To 2D: All Audio Sources in the Playlist Controller will be forced to fully 2D (Spatial Blend: 0).
- Force To 3D: All Audio Sources in the Playlist Controller will be forced to fully 3D (Spatial Blend: 1).
-
Force To Custom: All Audio Sources in the Playlist Controller will be forced to the Spatial Blend value in the field below.
- Spatial Blend: Only visible when Force To Custom is chosen. Set the Spatial Blend to use on all Audio Sources in this Playlist Controller with the slider here.
- Use Curve From Audio Source: Keep the curve from all Audio Sources in the Playlist Controller so any custom rolloff and Spatial Blend curves are left intact.
- Start Playlist on Awake: Pretty self-explanatory. This will play the first clip in the initial Playlist as soon as the Scene begins. If you have Shuffle Mode turned on, it will play a random clip instead.
- Shuffle mode: If you turn this on, tracks in the current Playlist will be played in random order. All will be played before the random pool refills. If this is not turned on, the tracks will be played in order from top to bottom.
- Loop Playlists: This defaults to on. This means that when there are no tracks left to play (with either Shuffle Mode or not), the song pool will refill and repeat. If you turn this off, the last song will fade out using your crossfade timing.
-
Auto Advance Clips: If you turn this on, as soon as a clip ends (or is X seconds away from ending if you have crossfading set for X seconds), another will start playing. It will be the next track if you are not using Shuffle Mode, or a random track if you are. Note that any tracks that have "Loop Clip" set will never Auto Advance. They will loop forever or until you tell the Playlist Controller to play another song.
Note: You can use the included DelayBetweenSongs script if you want to have a fixed or random pause between songs. You must turn off Auto Advance for the Playlist Controller you're using that script on. Just fill out the 3 properties in the Inspector and it works!
Collapsible Sections
You can fire Master Audio's Custom Events during certain events that happen in Playlist Controllers, such as Song Changed. This can be used to play "stinger" sound effects when a song changes, which is a very popular technique in AAA games. To play a sound effect or a wide variety of other things when a Custom Event happens, use the powerful Event Sounds script.
- Initialized Event: If you enable this section, you can select a Custom Event that will fire after the Controller is done initializing and is ready.
- Crossfade Started: If you enable this section, you can select a Custom Event that will fire whenever a crossfade starts.
- Playlist Started: If you enable this section, you can select a Custom Event that will fire whenever a Playlist starts.
- Playlist Ended: If you enable this section, you can select a Custom Event that will fire whenever a Playlist ends.
- Song Changed Event: If you enable this section, you can select a Custom Event to fire whenever the Song Changes (a new song starts).
- Song Ended Event: This is the same as Song Changed, except it occurs when a song ends (after crossfading out completely). If you have zero crossfade, both events will be fired at the same time.
- Song Looped Event: If you enable this section, you can select a Custom Event that will fire whenever a song loops (starts over after hitting the end).