
Level Wave Settings
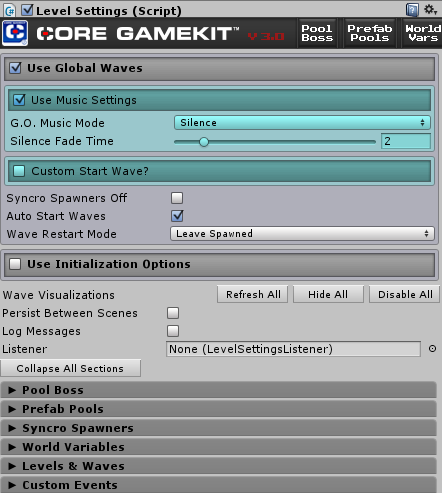
The LevelWaveSettings Game Object contains other sub-prefabs and sets up all Core GameKit functionality (Pooling / Spawning / World Variables / Prefab Pools). Here you can set up some Global Waves if you want sequential or randomly ordered waves (each of which are Timed or "Elimination" style), for waves like Galaga and Fruit Ninja. Each Global Wave can have multiple spawners that spawn the same or different things all at the same time. For a more open world game style, you may choose to use Triggered Spawners instead and no Global Waves.
When collapsed, Level Wave Settings looks like this:
Controls - There is an area of settings up top, as well 6 main collapsible sections, listed below. Click on the links below to read more about each.
Top Section
The following controls are available in this section:
- Use Global Waves: Off by default. Turn this on if you use Syncro Spawners so that you can set up Global Waves. When your final Global Wave complete, it will trigger "Game Over", which will turn off all Triggered Spawners and Killables unless you change their Game Over Behavior from the default of "Disable". Game over can also be triggered by World Variable values if you configure them that way.
-
More controls are visible if you've checked Use Global Waves:
-
Use Music Settings: Off by default. Turn this on to specify music for each wave. Turn this off if you want to control music from outside Core GameKit and all music settings will be invisible to you. If on, more controls appear.
-
Game Over Music Mode: This lets you control what music is played when Game Over happens. This has 3 choices.
-
Silence: The default - play nothing.
- Silence Fade Time: Specify how long to fade out the last wave's music.
-
Keep Previous Music: Continue playing the music from the last wave.
- Game Over Music Volume: Specify the volume for the Game Over music.
-
Play New: Specify some audio to play.
- Game Over Music: Specify the audio for Game Over here.
-
Silence: The default - play nothing.
Note: If you want to use the music features, attach the scriptWave Music Changerto the Game Object that has your Audio Listener. This is not necessary if you are using Master Audio Integration. -
Game Over Music Mode: This lets you control what music is played when Game Over happens. This has 3 choices.
-
Custom Start Wave: Off by default. If you turn this on, you can choose the Level and Wave the game will start on. This is good for testing higher waves without having to play the lower ones, or custom continues if you use World Variables for the values.
- Custom Start Level#: The level to start on.
- Custom Start Wave#: The wave to start on, in the level specified above.
- Syncro Spawners Off: You can disable all Syncro Spawners at any time by checking this checkbox.
-
Auto Start Waves: On by default. If you uncheck it, the first wave starts paused. You will need to call
LevelSettings.UnpauseWaveto start the first wave when you want (or use the Playmaker Custom Action). -
Wave Restart Mode: This has 3 choices and controls what happens to already spawned objects when you restart a wave of Syncro spawners.
- Leave Spawned: Nothing happens.
- Kill Spawned: Any spawns that are Killables will have their DestroyKillable methods called, so Death Prefabs will spawn if any. If they aren't Killables, they will simply despawn.
- Despawn Spawned: Any spawns will despawn.
-
Use Music Settings: Off by default. Turn this on to specify music for each wave. Turn this off if you want to control music from outside Core GameKit and all music settings will be invisible to you. If on, more controls appear.
-
Use Initialization Options: If you enable this section, you can specify one or more Custom Events to fire as soon as Level Settings has initialized. Simply click the Add button and select the Custom Event from the dropdown that appears in each row you add, as well as a sound to play.
- Initialized Sound: only visible with Master Audio integration because it uses Master Audio. This plays a Sound Group of your choice when Level Wave Settings has finished initializing.
-
Master Audio Sounds: This section only visible with Master Audio integration because it uses Master Audio.
- Win Sound: This plays a Sound Group of your choice when you win.
- Lose Sound: This plays a Sound Group of your choice when you lose.
- Level Started Sound: This plays a Sound Group of your choice when a Level starts.
- Level Ended Sound: This plays a Sound Group of your choice when a Level ends.
- Wave Skipped Sound: This plays a Sound Group of your choice when a wave is skipped.
-
Wave Visualization: Each wave in a Spawner (and Global Waves) have a Visualize Wave option that shows in Game View the visual spread of the wave spawns. These buttons are for all spawners, not single ones.
- Refresh All: Wave visualizations in the Scene will not be automatically updated if you change the prefab they are using after they have been spawned for visualization. Clicking this button will update them in the Scene.
- Hide All: This will hide all wave visualizations in the Scene. Then you can turn on whichever visualizations you want to see for clarity.
- Disable All: This will disable all wave visualizations in the Scene.
- Persist Between Scenes: Checking this box will mean the LevelWaveSettings Game Object is not destroyed when you load a new Scene. This will only work if the Game Object has no parent, as is the default. Note that you can make a prefab of your LevelWaveSettings game object and put it in all Scenes. If you load a new Scene and already have a persistent LevelWaveSettings game object from a previous Scene, the one in the new Scene will be destroyed automatically to avoid problems.
- Log Messages: If checked, will log to the Console events such as Level Up, Wave Up, Spawner Wave initiating, and Custom Events diagnostics, for debug purposes when you have a lot going on.
- Listener: Here you can drag in a LevelSettingsListener to hook into key events and do customized coding. Read more about Listeners.
-
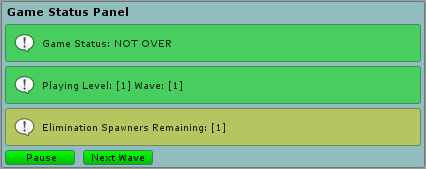
Game Status Panel: At runtime, there's an additional section inside the top section called the Game Status Panel. This section will show whether "Game Over" is true or not, which Global Level & Wave is currently playing, and whether the wave is paused or not. You have buttons to pause / unpause / change to the next wave. Additionally, time remaining is displayed for Timed Waves and Elimination Spawners Remaining appears for Elimination waves. It looks like the image below.
- Collapse All Sections: Click this button to collapse all 6 sections down so you don't have to scroll too much.
Pool Boss
The following controls are available in this section:
- Pool Boss Summary: Core GameKit includes Pool Boss! A powerful object pre-loading and reuse system to avoid Instantiate and Destroy calls during game play, which smooths out your frame rate. This section only shows you a summary of total prefabs configured in Pool Boss and and a button to take you there to the Pool Boss sub-Game Object where you can set up all your items.
Prefab Pools
The following controls are available in this section:
- Prefab Pools Summary: Core GameKit includes Prefab Pools, which are groups of weighted prefabs used by spawners and other features in Core GameKit. Here you can create a new Prefab Pool or click the gear icon to edit each Prefab Pool. Prefab Pool names must be unique, like most things in Core GameKit.
Syncro Spawners
This section cannot be used unless you have checked "Use Global Waves" in the Top Section. The following controls are available in this section:
- Syncro Spawners Summary: Syncro Spawners are the spawner type that can spawn from your Global Waves. This section shows you each Syncro Spawner and a gear icon to navigate to each one. You also can create new Spawners here. Just set the name and color, then click "Create Spawner". You may wish to use red for enemy Spawners and green for power-ups or something similar.
World Variables
The following controls are available in this section:
- World Variables Summary: World Variables are used for score, lives, etc. and also to control your spawners and other Core GameKit scripts without writing any code. This section shows a summary of each World Variables, its type and a gear icon to navigate to each one.
Levels & Waves
This section cannot be used unless you have checked "Use Global Waves" in the Top Section. This section contains all Global Waves organized into Levels, each consisting of one or more waves. This section cannot be used unless you have checked "Use Global Waves" in the top section. The following controls are available in this section:
-
Show Custom Wave Classes: Off by default. This is for your use only, used to classify Global Waves as whatever you like - you specify the names. Useful to display custom icons per wave or other things (would require writing some code). Here you can add, edit and delete your Custom Wave Classes.
Note: decorating a public string variable with the [CoreWaveClass]in your scripts will allow you to select from a list of the Custom Wave Classes you have defined here. -
Last Level Completed: has 2 options and controls what happens when the final Level is completed.
- Win: The default - fire the Win event (Game Over is set to true when you Win or Lose).
- Repeat All Levels From Beginning: This will make an endless style game where beating the last wave in the last level will restart the first level immediately.
-
Use Wave Name Filter: Check this to enable filtering out Global Waves by partial name. The following fields show up if checked.
- Wave Name Filter: Type some text here. All Waves in all Levels whose name don't contain the text will be filtered out. If the textbox is empty, no filtering occurs. Note that you will need to give names to waves to use this or they will all have the default name.
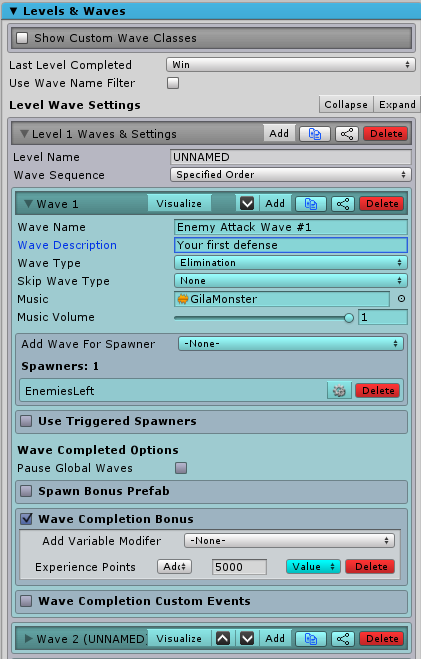
- Level Wave Settings: This section contains all Levels and their Waves. Initially there are none, and you will click "Add" to create the first Level. There's also buttons to collapse and expand all the Levels and Waves. It looks like this:
-
Title Bar Controls: Buttons and Icons that do the following:
- Shift Up / Down Icon: Use these icons to re-order your Levels. It will automatically fix up the settings in the Spawners that use the Levels so that you don't have to, as do the other controls here.
- Add Button: Creates a blank Level just after this Level.
- Clone Icon: Creates a copy of the Level just after this Level.
- Node Icon: Brings up the Relations Inspector window that shows you what this Level spawns.
- Delete Button: Deletes the Wave.
- Level Name: For your reference only. You may reference this in Listener classes and use code to display it when Levels advance.
- Level Name: For your reference only. You may reference this in Listener classes and use code to display it when Levels advance.
-
Wave Sequence: This controls the order of the Waves at runtime. There are 2 choices:
- Specified Order: The default. The Waves will be in the order you specify in the Inspector, top to bottom.
- Random Order: If you select this, the Waves in the Level will be ordered randomly when the Level is started. You will still play all the Waves.
-
Wave Settings: Each Wave in the Level has the following settings:
-
Title Bar Controls: Buttons and Icons that do the following:
- Visualize Button: Click this button to turn on "Visualize Wave" for all Spawners that use this wave and turn off Visualize Wave for all other Waves. This will let you see quickly visualize all Spawners' Wave patterns for a wave at once. Items created for visualization purposes will have an eye icon on the far right in the Hierarchy so you know why they are there. Disabled Game Objects will have a gray icon instead of blue. Note that a max of 100 items per Wave will be visualized.
- Shift Up / Down Icon: Use these icons to re-order your Waves. It will automatically fix up the settings in the Spawners that use the Waves so that you don't have to, as do the other controls here.
- Add Button: Creates a blank Wave just after this Wave.
- Clone Icon: Creates a copy of the Wave just after this Wave.
- Node Icon: Brings up the Relations Inspector window that shows you what this Wave spawns.
- Delete Button: Deletes the Wave.
- Wave Name: For your reference only. You may reference this in Listener classes and display it when Levels or Waves are completed or started.
- Wave Description: Also for your reference only. You may reference this in Listener classes and use code to display it when Levels advance.
-
Wave Type: There are two Wave types. Choose one of the following.
-
Timed: Timed Waves last a certain number of seconds (see Duration settings, next). Additional settings for Timed Waves:
- Duration (number of seconds): This is how long the Wave lasts.
- End When All Killed: Checking this will make the Wave end when everything is killed. Only works with non-repeating Spawner Waves. Basically this allows you to have a time-limited Elimination Wave. It will also end if the time elapses.
- Elimination: Elimination Waves don't care about time. An Elimination Wave is over as soon as all spawned items are either killed or despawned (inactive Game Objects).
Note: You can end the current Wave by calling LevelSettings.EndWave()from code. By making a Timed Wave of say 10 seconds with no Spawners assigned to that wave and calling EndWave when a user says they are ready, you can create common Tower Defense games with in-between Wave setup time. There are also various other scripting methods you can call to do things. Please refer to the Core GameKit API. -
Timed: Timed Waves last a certain number of seconds (see Duration settings, next). Additional settings for Timed Waves:
-
Skip Wave Type: This lets you dynamically skip the Wave based on some criteria. The choices are:
- None: Never skip
- Always: Always skip. Useful for the testing.
- If World Variable Value Above: This will let you add one or more World Variables with target values so you can say that if the player's score is >= 3000, then skip this Wave for example.
- If World Variable Value Below: This will let you add one or more World Variables with target values so you can say that if the player has <= 2 lives, then skip this Wave for example.
-
Music Settings: Only visible if you have turned on Use Music Settings in the Top Section. Controls:
-
Music Mode: Not visible for the first Wave of the first Level (instead it assumes "Play New"). This lets you control what music is played when Game Over happens. This has 3 choices.
-
Silence: The default - play nothing.
- Silence Fade Time: Specify how long to fade out the last Wave's music.
-
Keep Previous Music: Continue playing the music from the last Wave.
- Music Volume: Specify the volume for the Wave music.
-
Play New: Specify some audio to play.
- Music: Specify an Audio Clip for the Wave here.
-
Silence: The default - play nothing.
- Music Volume: What volume to play the Audio Clip at.
-
Music Mode: Not visible for the first Wave of the first Level (instead it assumes "Play New"). This lets you control what music is played when Game Over happens. This has 3 choices.
-
Wave Spawners Section: This section will show you which Spawners are set up to spawn during this Wave. The following controls appear:
- Add Wave For Spawner: Pick a Spawner from this dropdown to create a blank Wave in that Spawner for this Global Wave. Only Spawners that do not have a row below will appear here.
- Spawner Rows: Each row shows a Spawner with a gear icon to go to the Spawner and a Delete button to delete the Spawner Wave.
-
Spawners To Use: If you have more than one Spawner for this Wave, this dropdown appears. There are 2 choices:
- All: The default. All Spawners will spawn.
- Random Subset: Here you will specify a min and max, to basically "use a random number of Spawners between 2 and 5", based on your min / max for this Wave.
-
Use Triggered Spawners: Appears only for Elimination Waves. This allows you to also wait for 1 or more Triggered Spawner Elimination Waves before the Global Wave is considered completed. The following controls appear if checked:
- Add Button: Adds a blank row.
- Triggered Spawner Row: For each row to be valid, you must select a Triggered Spawner in the first field (drag it in), then select an Elimination Wave from the dropdown next to that. Buttons also appear to delete the row or select the Triggered Spawner.
- Wave Completion Options: This section gives you options for things that can happen when the Wave is completed.
- Pause Global Waves: Check this box to pause Global Waves at end of the Global Wave. This way you can show a message or whatever you like and then unpause the Global Waves when ready to proceed, via code or other means.
-
Spawn Bonus Prefab: This section allows you to configure something to spawn from the location of the last eliminated item of the Wave. Only visible for Elimination Waves. If checked, the following fields appear:
-
Bonus Prefab Type: 2 choices.
-
Specific: Select a single prefab to spawn.
- Bonus Prefab: Drag your prefab here.
- Prefab Pool: Selecting Prefab Pool allows you to have a weighted group of prefabs instead of a single one).
- Bonus Prefab Pool: Select your already created Prefab Pool here.
-
Specific: Select a single prefab to spawn.
-
Spawn % Chance: If less than 100, the prefab will only be spawned X% of the time (random). If you specify 30 for this value, 30% of the time you will get something spawned. This is great for spawning power-ups from certain power-ups sometimes.
- Spawn Quantity: This controls how many will be spawned if the Spawn % Chance is a "pass".
-
Bonus Prefab Type: 2 choices.
- Wave Completion Bonus: Enable this section if you want to award score or any other World Variable changes to the player for completing the Wave. Add a row by selecting your World Variable from the dropdown list and enter the value to add (negative or positive whole numbers).
- Wave Completion Custom Events: Enable this section if you want to fire Custom Events when completing the Wave. Add a row by clicking "Add", then select your already created Custom Event from the dropdown.
-
Title Bar Controls: Buttons and Icons that do the following:
Each Level has the following settings:
LevelSettings. IsGameOver = true
You can pause / unpause all Spawners and wave advancement in LevelWaveSettings like this:
LevelSettings. PauseWave();
LevelSettings.UnpauseWave();
This is useful when you might want to show a cutscene before the next wave starts.
LevelSettings.RestartWave();
This can be used to start a wave over. Repeat count goes to zero and wave unpauses. For the complete API, consult the API website here.
Custom Events
Custom Events are used for a variety of different things in Core GameKit, including spawning Waves in Triggered Spawners, and the very powerful Universal Custom Event Receiver script. For now, we'll just show how to create the categories and Custom Events. To learn the rest of their very flexible settings, click here to read more. The section looks like this:
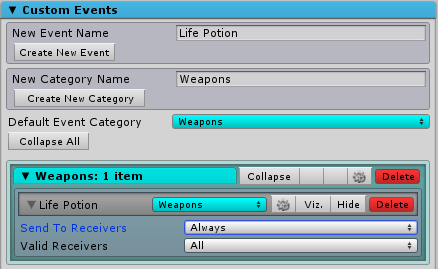
The following controls appear here:
- Create New Event: Type the name of your event and click this button to create it, under the category selected in the blue field "Default Event Category".
- Create New category: Type the name of your category and click this button to create it. You can have as many categories as you like.