
Killables
Killable is an extremely powerful and compact script, used for pickups (loot / health), enemies, player objects, weapons and more! It eliminates the use of Triggered Despawner in most cases, and consolidates a lot of functionality into a concise unit. You can set Killables to modify any number of World Variables when they are killed or damaged. Killables do damage to each other through Attack Points and Hit Points. Below are some commonly points of confusion so they're up top.
Note: Important information about Colliders, essential to having Killables damage each other:
- To use Killable normally, Unity collisions or triggers need to take place for Hit Point exchanges to happen. That means (and this is how Unity works) that for a collision or trigger to take place, both objects need to have a Collider Component, and at least one of them needs to have a Rigidbody Component. Either 3d or 2d Colliders and triggers work for Killable combat.
- If you have child Game Objects under a Killable that have their own triggers or Colliders, this can cause unwanted combat hits to occur from colliding with the other child triggers. To prevent this, give the child Collider Game Objects a Kinematic Rigidbody. However, if your top-level Killable doesn't contain a Collider, you will need to use the Killable Child Collision script instead.
- For 2D Users: To get Killables to both damage each other when one is getting killed, you may need to open the Physics 2D screen from
Edit -> Project Settings -> Physics2Dand turn off the checkbox labeled "Change Stops Callbacks". This is important because Unity 2D collisions are treated differently by default.
Note: Important information about Renderers:
- For Visible and Invisible events and triggers to work normally, there must be a Renderer Component on the same Game Object you put Killable on. If you have the Renderer in a child Component instead, you will need to add a Killable Child Visibility script to the child Game Object that contains the Renderer.
Note: Despawn vs Die. There are several options in Killable that have you choose whether to it despawns or dies. Despawn means it just disappears, and would spawn a Vanish Prefab if any is configured. Die means the Killable has been "killed", so you will not see the Vanish Prefab. However you will see any Death Prefabs and the Death World Variable Modifiers will be used.
Go ahead and add one to a Scene object and let’s take a look at the settings. From the Component menu, choose Dark Tonic -> Core GameKit -> Combat -> Killable.
The Inspector looks like this:
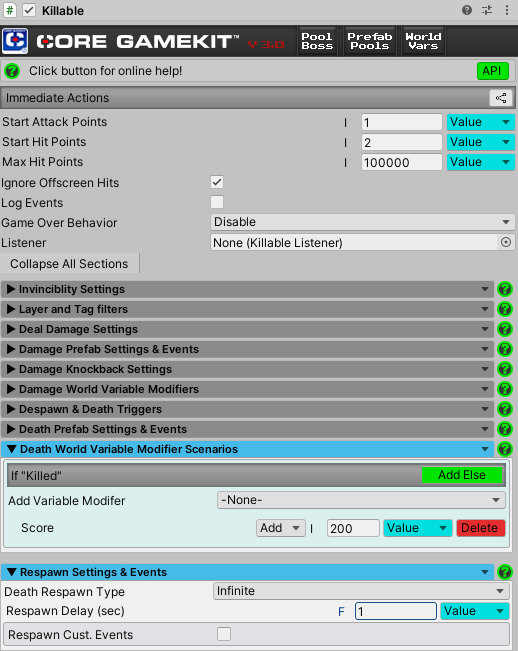
There are 11 sections of controls and 2 more information sections:
- Top Section: The main settings such at Hit Points, Attack Points, Listener.
- Invincibility Settings: Settings dealing with Invincibility.
- Layer & Tag Filter: Layer & Tag filters so you can choose which other Game Objects will register as a hit to this one.
- Deal Damage Settings: Specify what happens when you deal damage to other Killables.
- Damage Prefab Settings & Events: Settings specifying what happens when you get damaged.
- Damage Knockback Settings: Settings specifying knockback to and from other Killables.
- Damage World Variable Modifiers: Specify which World Variables get modified when you get damaged.
- Despawn & Death Triggers: Specify what causes you to despawn and/or die.
- Death Prefab Settings & Events: Settings specifying what happens when you get killed.
- Death World Variable Modifiers: Specify which World Variables get modified when you get killed.
- Respawn Settings & Events: Specify if you respawn after death and other related settings.
- Additional Runtime Controls: Extra goodies that are there at runtime.
- API Sample: A couple quick samples from the API.
Top Section
The following controls appear here:
-
Immediate Actions: More buttons appear here at runtime, but at edit time the following is here:
- Node Icon: This pops up a graph of what Killables are spawned by events in other Killables in the Scene (Death, Damaged, Deal Damage, Invincible Hit and other events), courtesy of the free version of RelationsInspector. More info here.
-
Hit Points / Attack Points: This allows single and multiple hit targets automatically. Hit Points is the amount of damage it takes to kill this Killable. Attack Points is how much damage this Killable does to other Killables when it collides through a Collider or trigger. Note that other non-Killable objects will not do any "damage" to Killable if colliding, unless you configure that under Despawn & Death Triggers. For many game genres, you may end up using Killable for almost every object because of these fields! For example, if I’m doing a tower defense game, the first enemy might have 5 Hit Points and 1 Attack Point. My first weapon might only have one Attack Point, so it will take 5 direct hits of my weapon to kill the enemy.
- Start Attack Points: The Attack Points that the Killable will begin with. For items you might want to collect but not damage your player (drops), you can choose 0 Attack Points.
-
Start Hit Points: The Hit Points that the Killable will begin with.
- Sync H.P. Variable: This checkbox is only visible if you're using a World Variable for Start Hit Points. Defaults to off. If you check the box, the World Variable will be updated with the Remaining Hit Points of that Killable every time they change. This is good for a player Killable to update a Health variable for instance. It is not a good idea to use this on a prefab that has more than one instance in the Scene, because the World Variable value will not be predictable and may jump around.
- Max Hit Points: The maximum amount of Hit Points possible. Core GameKit will not allow the Remaining Hit Points to exceed this value.
- Ignore Offscreen Hits: Defaults to off. This means collisions between Killables that are offscreen (invisible to camera) will not do damage to each other. Invisible is determined by a Renderer, and does not work with most sprite implementations.
- Log Events: Turn this on if you want detailed logs in the Console of why Hit Points are not being changes via Killable collisions.
- Game Over Behavior: This setting allows you to choose whether the Killable continues to register collisions or use Respawn settings when "Game Over" is true. Choose "Behave As Normal" if you want those to continue regardless, otherwise it will disable.
- Listener: Here you can drag in a KillableListener to hook into key events and do customized coding. For more about Listeners go here.
-
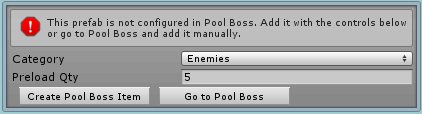
If you have not set up this Killable's Game Object in Pool Boss, the following section will appear in the Inspector letting you do it without leaving the current Inspector, as long as the Category you want to add it to already exists. This is a time saver. Just create the Categories up front if you can in Pool Boss. Read more here.
- Collapse All Section Button: Collapses all the Killable sections so you don't have to scroll so much.
Invincibility Settings
Settings for being invincible - looks like this:
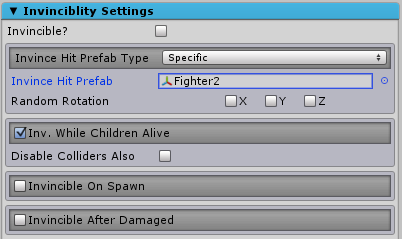
The following controls appear here:
- Invincible: Check this to make the Killable only deal damage but not receive it while it's checked. Good for temporary invincibility and other effects.
- Invincible Hit Sound: Only visible with Master Audio integration because it uses Master Audio. This will play a sound of your choice when an invincible hit occurs.
-
Invince Hit Prefab Type: This configures what prefab will be spawned if the Killable gets hit while Invincible. 3 choices:
- None: Nothing will spawn.
-
Specific: The default. You will select a prefab to spawn.
-
Invince Hit Prefab: This is the prefab you will be spawning.
Note: If you have not set up this prefab in Pool Boss, the following section will appear in the Inspector letting you do it without leaving the current Inspector, as long as the Category you want to add it to already exists. This is a time saver. Just create the Categories up front if you can in Pool Boss. Read more here.
-
Invince Hit Prefab: This is the prefab you will be spawning.
-
Prefab Pool: You will use a Prefab Pool for a weighted group of prefabs instead of a single one.
- Invince Hit Prefab Pool: Select one of your already created Prefab Pools from the dropdown. There is a gear icon to the right that you can click to navigate to the Prefab Pool and make changes.
-
As long as you don't have "None" selected for Invince Hit Prefab Type, this field will appear:
- Random Rotation X/Y/Z: Checking these will assign a random rotation to the Invince Hit Prefab after it has spawned on the selected axes.
-
Inv. While Children Alive: Defaults to true. This means that you cannot damage this Killable until you kill all sub-Killables it has under it (read about Composite Killables for more info on sub-Killables).
- Disable Colliders Also: Only visible and works when the previous checkbox is checked. Defaults to false. Turning this on will disable the Colliders for this Killable while it has any sub-Killables under it. This is useful if your sub-Killables wouldn't be able to be hit otherwise because of their positioning in relation to their parent (this Killable). When the last sub-Killable is killed, the Collider will be re-enabled automatically. A good option to have. Also helps you to create boss enemies where you have to kill things in a certain order.
-
Invincible On Spawn: Check this if you want the Killable to be invincible for a configurable amount of time, each time it spawns. If this is checked, the next field is visible.
- Invincibility Time (sec): The amount of time the Killable will be invincible when it spawns.
-
Invincible After Damaged: Check this if you want the Killable to be invincible for a certain amount of time after each time it's damaged. If checked, the next field is visible.
- Invincibility Time (sec): The amount of time the Killable will be invincible each time after it gets damaged.
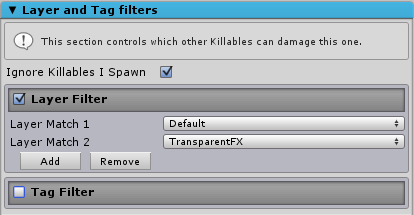
Layer & Tag Filter
Choose which other Game Objects will register as a hit to this one. This section looks like this:
The following controls appear here:
-
Ignore Killables I Spawn: Checked by default. Checking this means that regardless of Layer or Tag, any Killables you collide with that were spawned from this Killable (like Damage prefabs, et al) will not do any damage to this Killable. This can allow cool things in multiplayer games such as spawning projectile weapons (even if they're in your Layer filter) that don't hurt you. However, that same projectile shot by another player will damage you.
Note: If you are spawning your own Killables from your own code, make sure to call the RecordSpawnermethod on the spawned Killable to get this field to work properly. -
Layer / Tag Filter: These refer to the Layer and Tag of the other object you’re colliding or trigger-colliding with. By default all Layers & Tags of colliding objects will trigger combat between the 2 objects (via Killable). How it works:
- If you check the Layer Filter checkbox, you can specify which Layer(s) will cause combat. All other Layers will not.
- If you check the Tag Filter checkbox, you can specify which Tag(s) will cause combat. All other Tags will not.
- Tag and Layer Filters work together, so if you select a Tag that is never used by objects in the selected Layer filter, combat will never occur. Most likely you will only use a Layer OR Tag Filter for a Killable, but be aware of this.
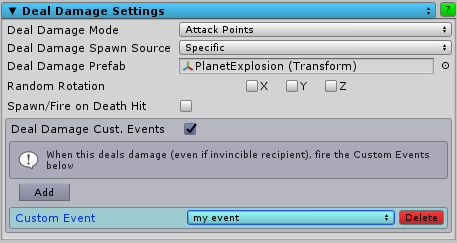
Deal Damage Settings
Specify what happens when you deal damage to other Killables. This section looks like this:
The following controls appear here:
- Deal Damage Sound: Only visible with Master Audio integration because it uses Master Audio. This will play a sound of your choice when damage is dealt by this Killable.
-
Deal Damage Mode: This allows you to choose between different methods of assigning damage.
- Attack Points: The default. Damage equal to this Killable's Attack Points will be dealt to the other Killable it's fighting.
- Calculation: Choose this for more options on using a calculation for the amount of damage to be dealt to the other Killable.
- Deal Damage Calc. Mode: Only visible when "Calculation" is chosen for "Deal Damage Mode". Choose from several options:
- Fixed: The amount of damage is fixed.
- Fixed Times Mass: The amount of damage is a fixed amount times the mass of the Rigidbody.
- Fixed Times Velocity: The amount of damage is a fixed amount times the velocity of the Rigidbody.
- Fixed Times Velocity Times Mass: The amount of damage is a fixed amount times the velocity of the Rigidbody times the mass of the Rigidbody.
- Fixed: The amount of damage is fixed.
- Fixed Damage: Here you enter the amount of Fixed Damage used for the damage calculation, if you chose "Damage" for "Deal Damage Mode". Otherwise not visible.
-
Deal Damage Spawn Source: This configures what prefab will be spawned when the Killable deals damage to another Killable. 3 choices:
- None: Nothing will spawn.
-
Specific: The default. You will select a prefab to spawn.
-
Deal Damage Prefab: This is the prefab you will be spawning.
Note: If you have not set up this prefab in Pool Boss, the following section will appear in the Inspector letting you do it without leaving the current Inspector, as long as the Category you want to add it to already exists. This is a time saver. Just create the Categories up front if you can in Pool Boss. Read more here.
-
Deal Damage Prefab: This is the prefab you will be spawning.
-
Prefab Pool: You will use a Prefab Pool for a weighted group of prefabs instead of a single one.
- Deal Damage Prefab Pool: Select one of your already created Prefab Pools from the dropdown. There is a gear icon to the right that you can click to navigate to the Prefab Pool and make changes.
-
As long as you don't have "None" selected for Deal Damage Prefab Type, these fields will appear:
- Random Rotation X/Y/Z: Checking these will assign a random rotation to the Deal Damage Prefab after it has spawned on the selected axes.
- Spawn/Fire On Death Hit: If selected, this will spawn the Deal Damage Prefab and fire any Custom Events defined on the final killing hit. Otherwise, it will not.
- Deal Damage Custom Events: You may specify one or more Custom Events to fire when dealing damage.
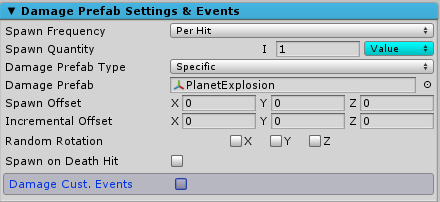
Damage Prefab Settings & Events
A "Damage Prefab" can spawn things whenever your Killable takes damage. You could spawn sparks, smoke, actually enemies, power-ups or whatever you like. This section looks like this:
The following controls appear here:
- Damage Prefab Sound: Only visible with Master Audio integration because it uses Master Audio. This will play a sound of your choice when damage prefabs are spawned (only 1 sound regardless of how many you're spawning) by this Killable.
-
Spawn Frequency: This will choose when to spawn Damage Prefabs. There are four modes:
- None: The default. Nothing will spawn.
-
Per Hit: This will spawn X (defaults to 1) Damage Prefabs each time the Killable gets hit by another Killable, regardless of how many Hit Points were lost.
- Spawn Quantity: This controls the "X". So if you want 4 Damage Prefabs to spawn instead of 1 (the default), change this setting.
-
Per Hit Point Lost: This will spawn X (defaults to 1) Damage Prefab for each Hit Point lost when the object gets hit by another Killable.
- Spawn Quantity: This controls the "X". So if you want 4 Damage Prefabs to spawn instead of 1 (the default), change this setting.
-
Per Group Hit Points Lost: This will spawn X (defaults to 1) Damage Prefab each time a certain amount of Hit Points are lost. You specify that amount in the next field.
- Group H.P. Amount: The amount of Hit Points the Killable must lose to spawn one Damage Prefab.
- Spawn Quantity: This controls the "X". So if you want 4 Damage Prefabs to spawn instead of 1 (the default), change this setting.
-
Damage Prefab Type: 2 choices.
-
Specific: The default. You will select a prefab to spawn.
-
Damage Prefab: This is the prefab you will be spawning copies of.
Note: If you have not set up this prefab in Pool Boss, the following section will appear in the Inspector letting you do it without leaving the current Inspector, as long as the Category you want to add it to already exists. This is a time saver. Just create the Categories up front if you can in Pool Boss. Read more here.
-
Damage Prefab: This is the prefab you will be spawning copies of.
-
Prefab Pool: You will use a Prefab Pool for a weighted group of prefabs instead of a single one.
- Damage Prefab Pool: Select one of your already created Prefab Pools from the dropdown. There is a gear icon to the right that you can click to navigate to the Prefab Pool and make changes.
-
Specific: The default. You will select a prefab to spawn.
- Spawn Offset (Vector3): The distance from the Killable's Transform to spawn the Damage Prefab.
- Incremental Offset: Works like Incremental Settings in Syncro Spawners. Each item past the first spawned will have this Vector3 added to it from the position the previous spawned at.
- Random Rotation (X/Y/Z): Selecting these will assign a random rotation to the Damage Prefab after it has spawned on the selected axes.
- Spawn/Fire On Death Hit: Checking this will spawn Damage Prefabs during the final death hit (defaults to off). And also fire any Custom Events defined below.
- Damage Custom Events: You may specify one or more Custom Events to fire when taking damage.
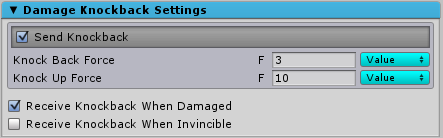
Damage Knockback Settings
This section is only visible and functioning when you are using Rigidbodies (2D Rigidbody as well) or CharacterControllers on a Killable. It allows this Killable to knock other Killables back and/or up when they are hit. This can setup trampolines or other cool physics interactions. There are separate settings for sending and receiving knockback. All are deactivated by default. Note that only Killable with a "gravity" Rigidbody (or CharacterController) can receive knockback, but even non-gravity ones can send knockback. The section looks like this:
The following controls appear here:
- Knockback Sound: Only visible with Master Audio integration because it uses Master Audio. This will play a sound of your choice when this Killable knocks something back.
-
Send Knockback: Check this to knockback any other Killables this Killable collides with. Knockback forces are only sent when the damage dealt to the other Killable is greater than zero.
- Knock Back Force: How much force to knock "back". For 2D Rigidbodies this will either knock left or right, depending on the position of the attacker in relation to this Killable.
- Knock Up Force: How much force to knock "up".
- Receive Knockback When Damaged: Check this to receive knockback force from other Killables.
- Receive Knockback When Invincible: Check this to receive knockback force from other Killables even when this Killable is invincible.
Damage World Variable Modifiers
Here you can specify any number of World Variable modifications to make any time the Killable takes damage.

For information on how to configure this section, read this.
Despawn & Death Triggers
Configure what causes you to despawn and/or die, including non-Killables. This section looks like this:
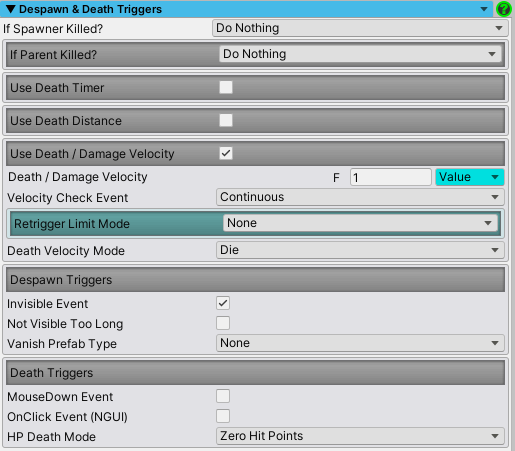
The following controls appear here:
-
If Spawner Killed: This allows you to make the Killable die or despawn (die means that Death Prefab and Death World Variable Modifiers will happen, for despawn neither will) if the object that spawned it is killed (or despawned). This works if the Killable was spawned by a Killable Damage Prefab or Death Prefab, a Triggered Spawner, or a Syncro Spawner.
- Do Nothing: The default. Nothing happens.
- Despawn: This and "Die" modes will keep track of when the object that spawned this Killable is despawned or killed. If that happens, this mode will despawn the Killable.
- Die: Same as Despawn mode, but will spawn the Death Prefab is any was specified and fire any Death Custom Events.
-
If Parent Killed: Same choices as "If Spawner Killed" above, but triggers when a parent Killable is killed. This can be used to automatically kill child Killables of a Killable.
- Parent Killable: Defaults to the parent of this Killable, if any, but you can use the parent's parent if you drag it into to this field, for example. If this field is empty, nothing will happen because it won't know what to do.
-
Use Death Timer: If you check this box, you can have a Killable kill or despawn itself after X seconds. The following controls will appear when it's checked:
- Death Timer (sec): The number of seconds before the Killable will kill or despawn itself, depending on the next field.
- Time Up Action: Choose Do Nothing, Die or Despawn. The action you select will happen when the Death Timer has finished.
-
Use Death Distance: If you check this box, you can have a Killable kill or despawn itself after moving X distance from its spawn position. The following controls will appear when it's checked:
- Death Distance (units): The distance the Killable must move before it will kill or despawn itself, depending on the next field.
- Distance Passed Action: Choose Do Nothing, Die or Despawn. The action you select will happen when the Death Timer has finished.
-
Use Death / Damage Velocity: Only visible for Gravity Rigidbodies. If you check this box, you can specify a terminal velocity at which the Killable dies or takes damage, if reached:
- Death / Damage Velocity: The velocity threshold that will damage or kill the Killable.
- Velocity Check Event: Choose Continuous (the default) or Collision. This is when the velocity is checked. If you choose Collision, it must be a valid Collision (must pass any Layer / Tag filter you've set on the Killable).
- Retrigger Limit Mode: This allows you to prevent the velocity from happening too often by specifying the minimum interval in seconds or frames since the previous check. Specify number of rames by choosing "Frame Based" or specify seconds by choosing "Time Based".
-
Death Velocity Mode: Choose what happens when the Terminal Velocity is reached during a check. There are two options:
- Die: The default.
- Damage: If this is chosen, you have more options.
- Damage Calc. Mode: Only visible when "Damage" is chosen for "Death Velocity Mode". Choose from several options:
- Fixed: The amount of damage is fixed.
- Fixed Times Mass: The amount of damage is a fixed amount times the mass of the Rigidbody.
- Fixed Times Velocity: The amount of damage is a fixed amount times the velocity of the Rigidbody.
- Fixed Times Velocity Times Mass: The amount of damage is a fixed amount times the velocity of the Rigidbody times the mass of the Rigidbody.
- Fixed: The amount of damage is fixed.
- Fixed Damage: Here you enter the amount of Fixed Damage used for the damage calculation, if you chose "Damage" for "Death Velocity Mode". Otherwise not visible.
-
Despawn Triggers: This section contains several conditions you can choose to despawn the Killable under:
- Invisible Event: If this is checked, despawn when Killable becomes invisible.
-
Not Visible Too Long: This is for edge cases like if something spawns offscreen traveling even further offscreen. In such a case if would never become visible to then become invisible. So you can use this setting to tell the Killable to despawn if it's not visible after it has been spawned for X seconds. Specify the length in the next field:
- Not Visible Max Time: If this many seconds elapse and it's still not visible, despawn the Killable.
Note: The visible / invisible checks will not work if you don't have a Renderer Component on this Game Object, unless you use the Killable Child Visibility script properly. - Vanish Sound: Only visible with Master Audio integration because it uses Master Audio. This will play a sound of your choice when this Killable vanishes.
-
Vanish Hit Prefab Type: This setting allows you to specify what to spawn when the Killable despawns without being "killed". 3 choices:
- None: Nothing will spawn.
-
Specific: The default. You will select a prefab to spawn.
-
Vanish Prefab: This is the prefab you will be spawning.
Note: If you have not set up this prefab in Pool Boss, the following section will appear in the Inspector letting you do it without leaving the current Inspector, as long as the Category you want to add it to already exists. This is a time saver. Just create the Categories up front if you can in Pool Boss. Read more here.
-
Vanish Prefab: This is the prefab you will be spawning.
-
Prefab Pool: You will use a Prefab Pool for a weighted group of prefabs instead of a single one.
- Vanish Prefab Pool: Select one of your already created Prefab Pools from the dropdown. There is a gear icon to the right that you can click to navigate to the Prefab Pool and make changes.
-
As long as you don't have "None" selected for Vanish Hit Prefab Type, this field will appear:
- Random Rotation X/Y/Z: Checking these will assign a random rotation to the Vanish Hit Prefab after it has spawned on the selected axes.
-
Death Triggers: This section contains several conditions you can choose to kill the Killable under:
- MouseDown Event: Kills if you click on the Killable. Note that this will not work if your Killable is in the Ignore Raycast layer.
- OnClick Event (NGUI event): Kills when this happens if this is checked.
-
HP Death Mode: This chooses what kills the Killable, one even does it for hitting non-Killables. Four options:
- Zero Hit Points: The default. If Killable's HP reaches zero, kill it.
- Lost Any Hit Points: You would sometimes choose this for your weapons maybe, or for "poison weapons". Even if they lose a single Hit Point, they die. Otherwise if they were triggers, they would continue to pass through many enemies.
-
Collision Or Trigger: This means *any* Collision Or Trigger that passes the Layer / Tag Filter. Same as Lost Any Hit Points, but it will fire even when the Killable in invincible. Useful for making sure your projectile doesn't go through an object if they're both invincible, for instance.
- Allow Non-Killable Hits: This checkbox allows you to permit collisions with a non-Killable to cause the Killable to die as well.
- None: The Killable will never die automatically from HP loss. This may be used when integrating with other plugins. In this case, when you decide the Killable should be killed, call the
DespawnKillablemethod of the Killable script.
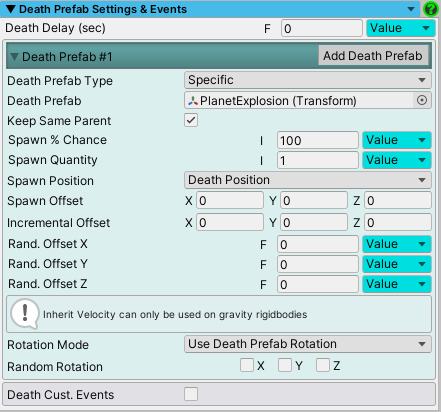
Death Prefab Settings & Events
A "Death Prefab" is for prefab replacement. Say you want a car prefab to be replaced with a smashed car prefab with you click it. The smashed car prefab we call a Death Prefab. Here's what that section looks like:
The following controls appear here:
- Death Sound: Only visible with Master Audio integration because it uses Master Audio. This will play a sound of your choice when this Killable dies.
- Death Delay (sec): Here you can specify a time delay before the Killable dies after lethal damage. That way you can play a death animation for example (uses WaitingToDestroyKillable method in the KillableListener).
- Add Death Prefab: Clicking this button will create another Death Prefab. You can add as many as you like, each with their own settings. They each will show in their own section with title bar "Death Prefab #X".
-
Death Prefab Type: This configures what prefab will be spawned if the Killable dies. 3 choices:
- None: Nothing will spawn.
-
Specific: The default. You will select a prefab to spawn.
-
Death Prefab: This is the prefab you will be spawning.
Note: If you have not set up this prefab in Pool Boss, the following section will appear in the Inspector letting you do it without leaving the current Inspector, as long as the Category you want to add it to already exists. This is a time saver. Just create the Categories up front if you can in Pool Boss. Read more here.
-
Death Prefab: This is the prefab you will be spawning.
-
Prefab Pool: You will use a Prefab Pool for a weighted group of prefabs instead of a single one.
- Death Prefab Pool: Select one of your already created Prefab Pools from the dropdown. There is a gear icon to the right that you can click to navigate to the Prefab Pool and make changes.
- Keep Same Parent: Defaults to on. If you uncheck this box, the Death Prefab will be spawned not as a child of its parent Transform (if it has one), but under the Pool Boss Game Object instead.
- Spawn % Chance: If less than 100, the Death Prefab will only be spawned X% of the time (random). If you specify 30 for this value, 30% of the time you will get a Death Prefab. This is great for spawning power-ups from certain power-ups sometimes.
- Spawn Quantity: This is how many of the Death Prefab will spawn if is passes the Spawn % Chance check. So if you have Spawn % Chance of 20% and Spawn Quantity of 5, then 20 % of the time you will spawn 5 Death Prefabs, and the rest of the time you will spawn zero.
-
Spawn Position: This chooses where the Death Prefab spawns. 2 choices:
- Death Position: The default. It will spawn exactly where the Killable was.
- Respawn Position: The Death Prefab will spawn at the current Respawn position, which can be set by code, but is otherwise the last location is spawned from.
- Spawn Offset: This lets you specify a distance from the dying Killable's position to spawn the death prefab(s).
- Incremental Offset: Works like Incremental Settings in Syncro Spawners. Each item past the first spawned will have this Vector3 added to it from the position the previous spawned at.
- Rand. Offset X/Y/Z: If this is not zero, a random number will be generated between -X and +X (and the same for Y and Z) and added to the spawn position, after Spawn Offset is applied.
- Inherit Velocity: If this is checked and both the Killable and the Death Prefab are gravity Rigidbodies, the current velocity of the Killable will be applied to the Death Prefab. This is cool if for instance you wanted a speeding car that hit something turn into a smashed car that still will fly around off the walls due to its momentum. Otherwise it would just stop there, which looks unrealistic (although cool also).
-
Rotation Mode: 3 choices:
- Inherit Existing Rotation: This will take the current rotation of the Killable and apply it to the Death Prefab when it is spawned.
- Use Death Prefab Rotation: This will use the Rotation of the actual Death Prefab assigned to the Killable.
-
Custom Rotation: You can specify a custom X/Y/Z angle in the next field:
- Custom Rotation Euler: Specify a Vector3 for rotation.
- Random Rotation: Here you can check the X, Y, and Z axes to make that axis randomly set.
- Death Custom Events: You may specify one or more Custom Events to fire when the Killable dies.
Death World Variable Modifiers
Here you can specify any number of World Variable modifications to make when the Killable dies. A collection of values to modify any number of World Variables is called a Scenario. By default each Killable has just one Scenario called "Killed". You can also add any number of additional Scenarios with the "Add Else" button, shown in the image below (make sure to name the Scenario in the textbox that appears).
To get any extra Scenarios to trigger besides the default "Killed" one, you have a few choices:
- Kill off the Killable by using the Core GameKit Destroy Killable (Playmaker Custom Action). It has a field you can enter the Scenario name in.
-
Call the DestroyKillable method on the Killable script yourself, passing in a Scenario name, i.e.
myKillable.DestroyKillable("scenarioName"); -
Subclass the Killable script and override the
DestroyKillablemethod. Add logic to change the Scenario name parameter before callingbase.DestroyKillable.Note:You should never add MonoBehaviour events to a subclass that exist in any of the parent classes (i.e. Killable) such as Start, Awake, etc. If you do it will "hide" the same event in the base class and things will not work properly. Instead override the appropriate method from Killable marked as "override". -
Use a Killable Listener and add logic in the
DeterminingScenariomethod to change the Scenario name before returning it.
The section looks like this:
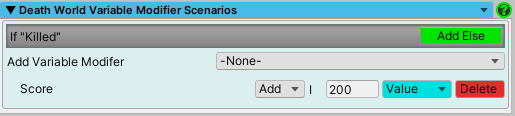
For information on how to configure this section, read this.
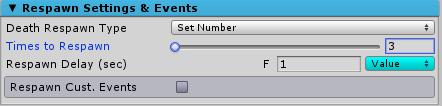
Respawn Settings & Events
Choose whether you respawn when you die and other options. Respawn location is set to spawn location the first time you spawn. To change the respawn location, set the property RespawnLocation on the Killable at any time from code. The section looks like this:
The following controls appear here:
- Respawn Sound: Only visible with Master Audio integration because it uses Master Audio. This will play a sound of your choice when this Killable respawns.
-
Death Respawn Type: 3 choices:
- None: The default. Killable will despawn when dead and not respawn.
- Infinite: Killable will respawn at its respawn location the next time it dies, an infinite number of times.
-
Set Number: Same as Infinite option, but you specify the number of times it will respawn. After that number, it will despawn the next time it dies and not respawn.
- Times To Respawn: The number of times you want it to respawn.
- Respawn Delay (sec): If you have chosen a Death Respawn Type other than "None", this field appears and allows you to delay the respawning by X seconds. This is used to play a death animation usually.
- Respawn Custom Events: You may specify one or more Custom Events to fire when you respawn.
Additional Runtime Controls
At runtime there are a few extra controls for Killable. You can see them here:
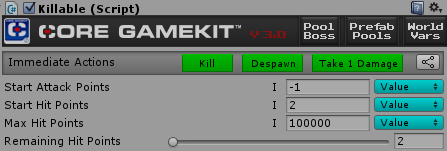
The following controls appear here:
-
Immediate Actions: Buttons here include:
- Kill: This will instantly kill the Killable.
- Despawn: This will instantly despawn the Killable (Death Prefabs and Death World Variable Modifiers will not be used).
- Take 1 Damage: This will inflict 1 point of damage on the Killable.
- Remaining Hit Points: The remaining Hit Points is displayed here and you can change it to whatever you like with the slider during runtime.
API Sample
Here's a couple methods from Killable you can call from code. For the complete API, consult the API website here. Playmaker Custom Actions also exist for these.
-
AddHitPoints(int pointsToAdd)This will add X Hit Points (and update Remaining Hit Points accordingly). You can use a negative value here as well. This will not register any damage though so if you want to be able to kill a Killable from current Hit Points changing, use the next method instead. -
TakeDamage(int damagePoints)This will subtract the damagePoints from currentHitPoints (which is Remaining Hit Points). This can kill the Killable depending on your Despawn & Death Triggers settings.